Table of Contents
Introduction
In this tutorial, I will walk you through how to migrate from Exchange 2013/2016 to Exchange 2019.
A migration from Exchange is something that can be scary but is relatively simple under 2 conditions:
- Prepare for migration using a checklist for example.
- That the starting environment (Exchange 2013/2016) has been correctly installed and configured (which is not always the case …)
The screenshots in the tutorial were taken on Exchange 2013. The procedure is the same with Exchange 2016.
In this tutorial, I detail the migration part, some points will be made by pointing to another tutorial.
Starting environment
Before starting, it is necessary to have a good understanding of your starting environment. For this lab here it is:
- Active Directory environment without problem.
- An Exchange 2013 server installed on Windows Server 2012R2.
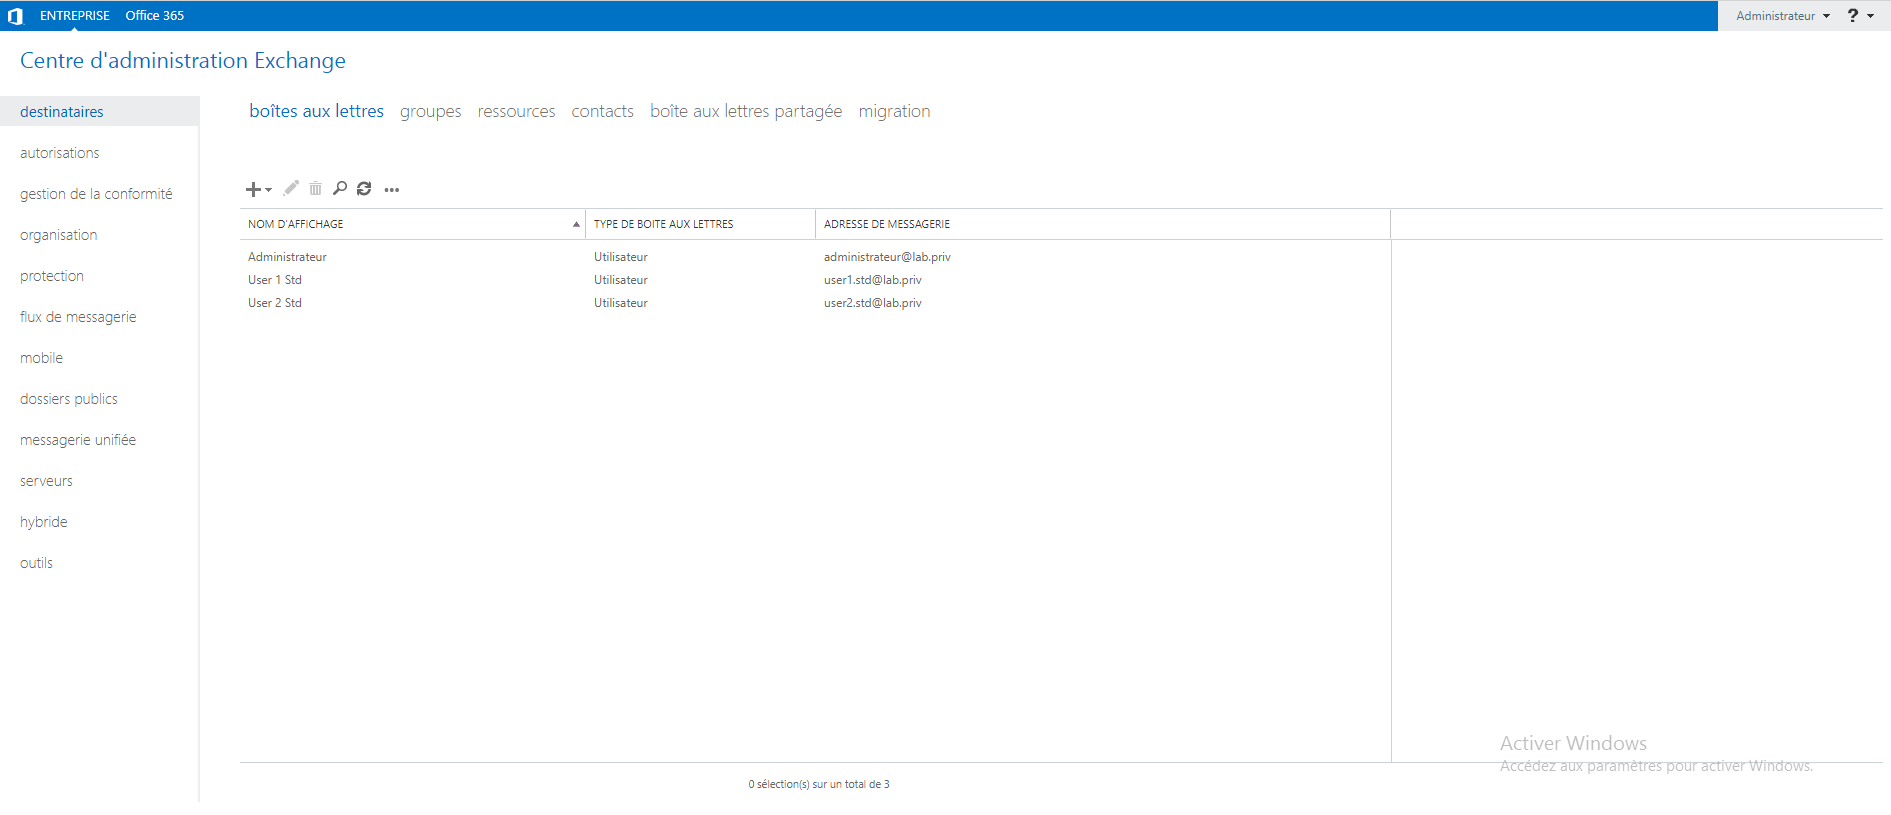
The mailboxes that will be migrated:
So that the migration can be done in good condition, it is imperative that the Exchange services use a personalized URL of the type mail.domain.tld and not the address of the server.
If not, configure URLs in Exchange.
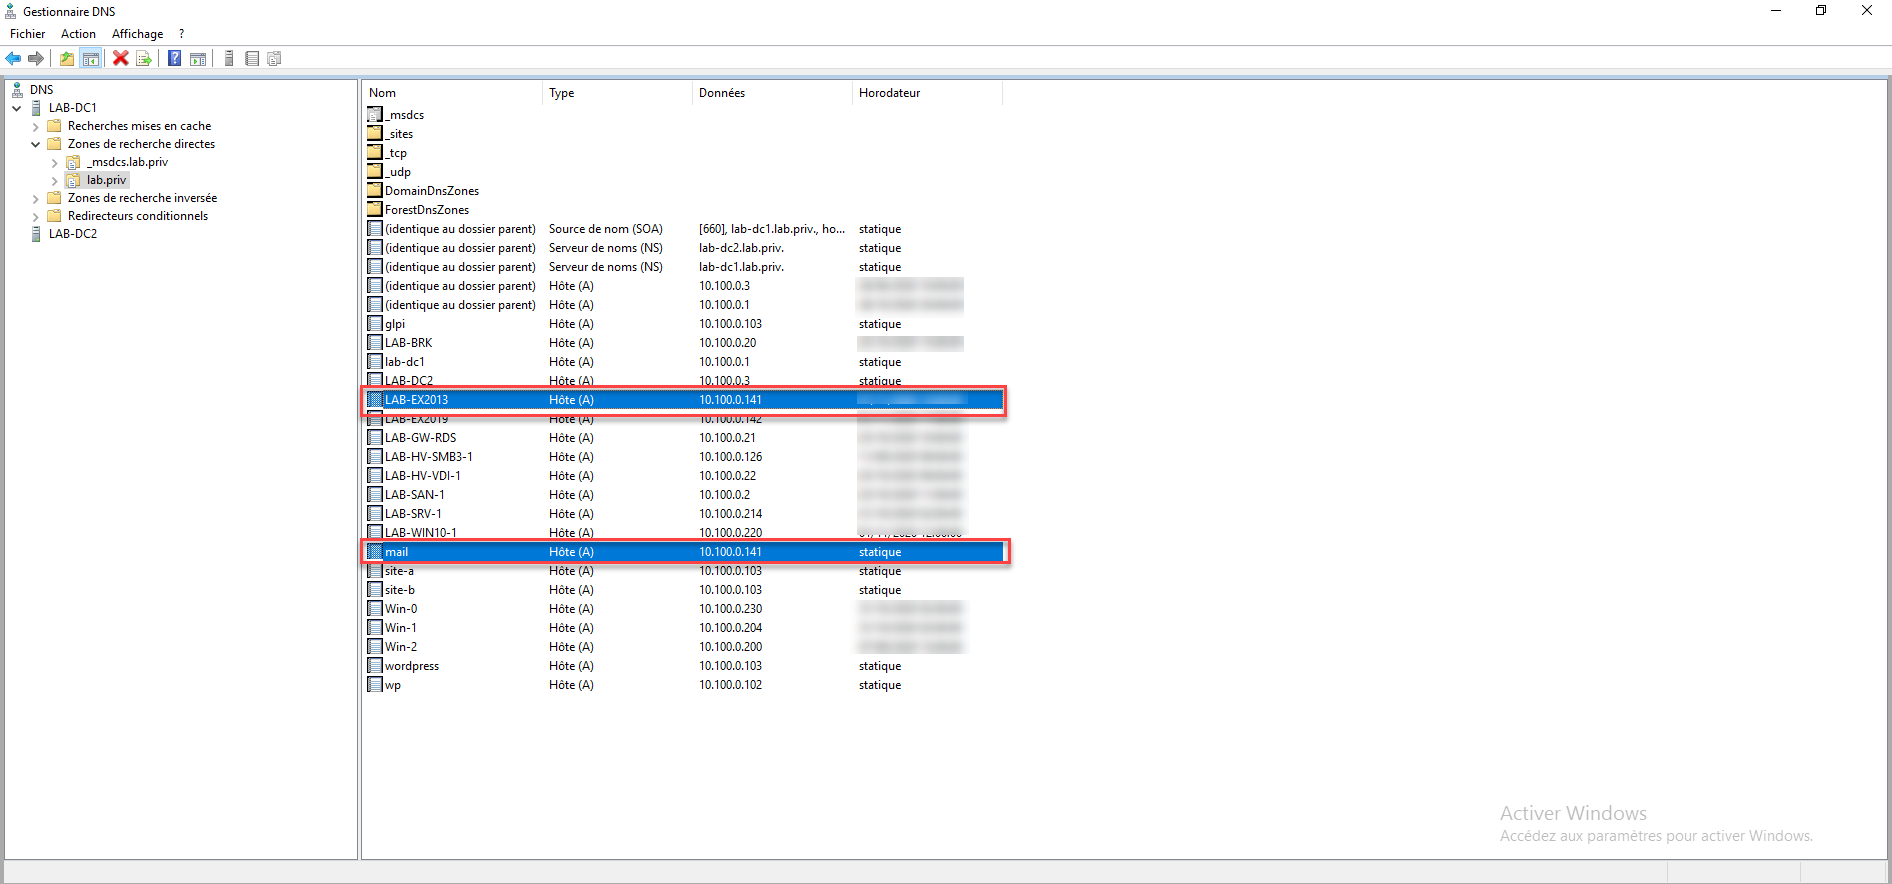
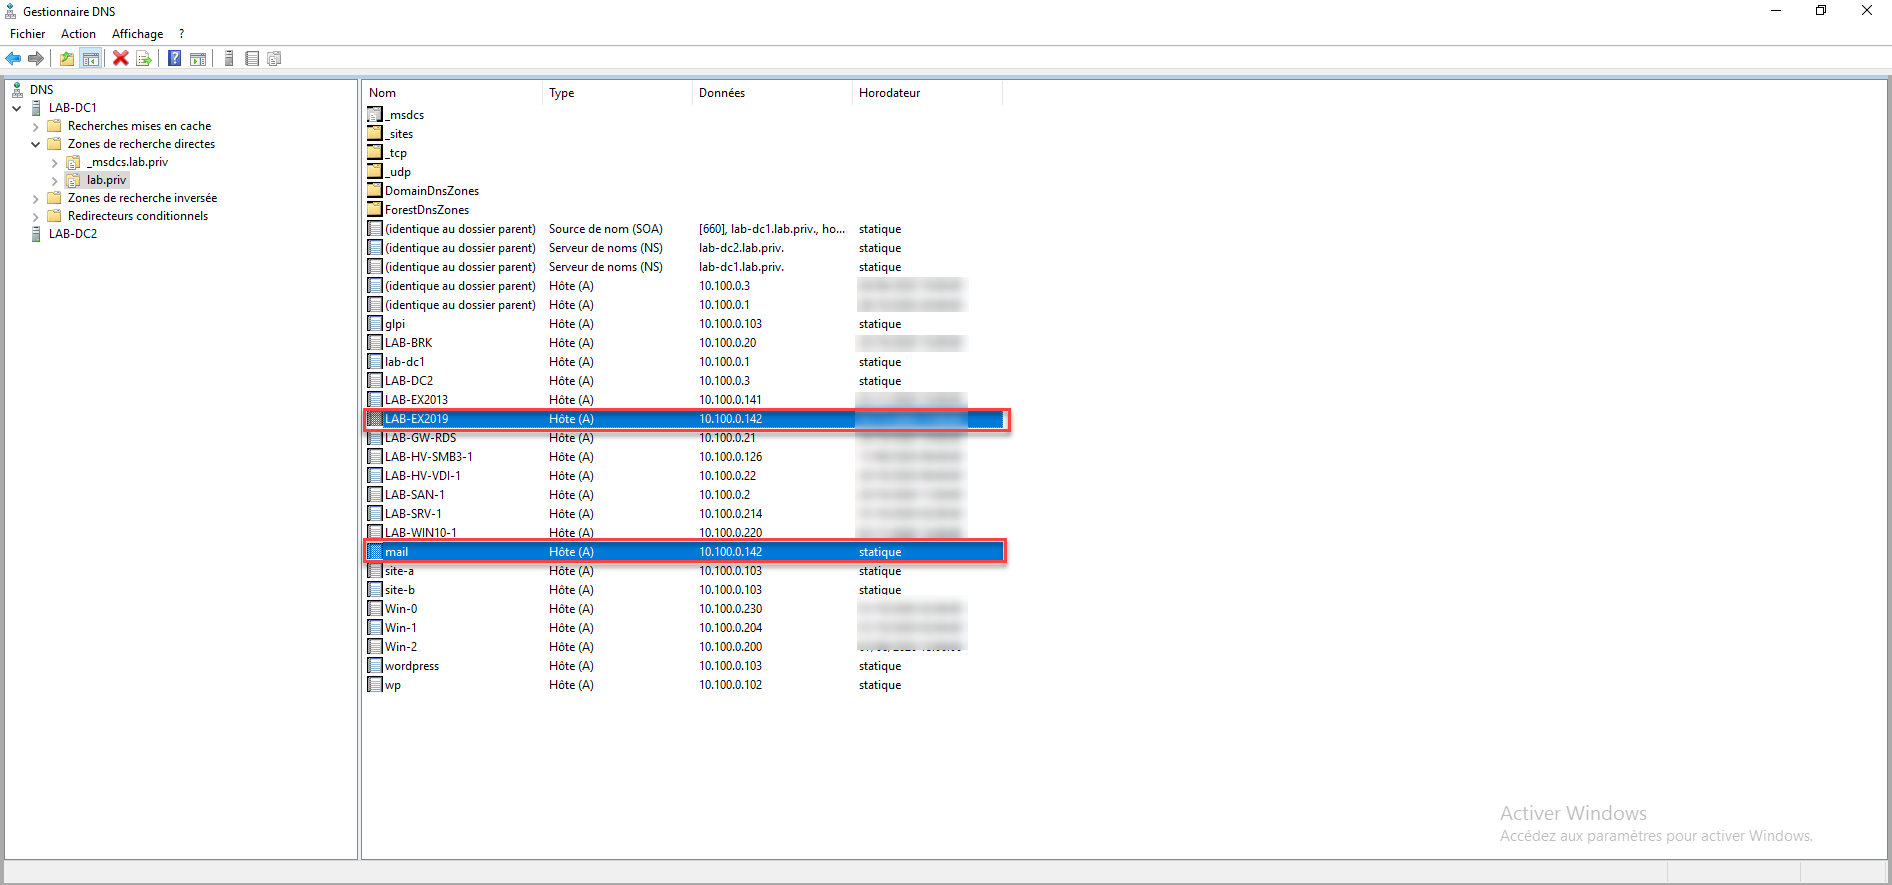
On the screenshot below, we can see the DNS record mail.lab.priv which points to the same IP address as the starting Exchange server.
Optional element but which subsequently facilitates the migration is to have renamed the default database if it is used.
It is possible to do this before migration, it has no impact on email services.
Prepare for migration
Before embarking on installing Exchange 2019 and performing the migration, here are some things to consider so that it goes smoothly.
It is necessary to master your various network flows towards Exchange, that is to say:
- The incoming and outgoing message flow because at some point you have to switch reception and send emails to the new installation, which can often involve modifying a firewall and / or MTA appliance flow.
- Control incoming HTTPS to Exchange, as for mail flows, at some point you must switch to the new version of Exchange, if you use a reverse proxy, check that it works correctly with Exchange 2019.
- List the applications and device that uses a Receive connector to send email, such as copiers (if you use a DNS record this should not be a problem).
Also provide:
- The SSL certificate (s) that must be reinstalled on Exchange 2019
- Check the compatibility of clients (Outlook / phones …) with Exchange 2019
- Certainly something else that I forgot specific to your environment …
Install Exchange 2019
Now that you’re ready, it’s time to move on to installing Exchange 2019. I won’t go into detail in this article. The tutorial: Exchange 2019: installation explains how to do it.
What I can advise you on the other hand is to do the installation at a “quiet” time, preferably an evening or a weekend, because the SCP service point of the autodiscover will not be good during the reconfigure it.
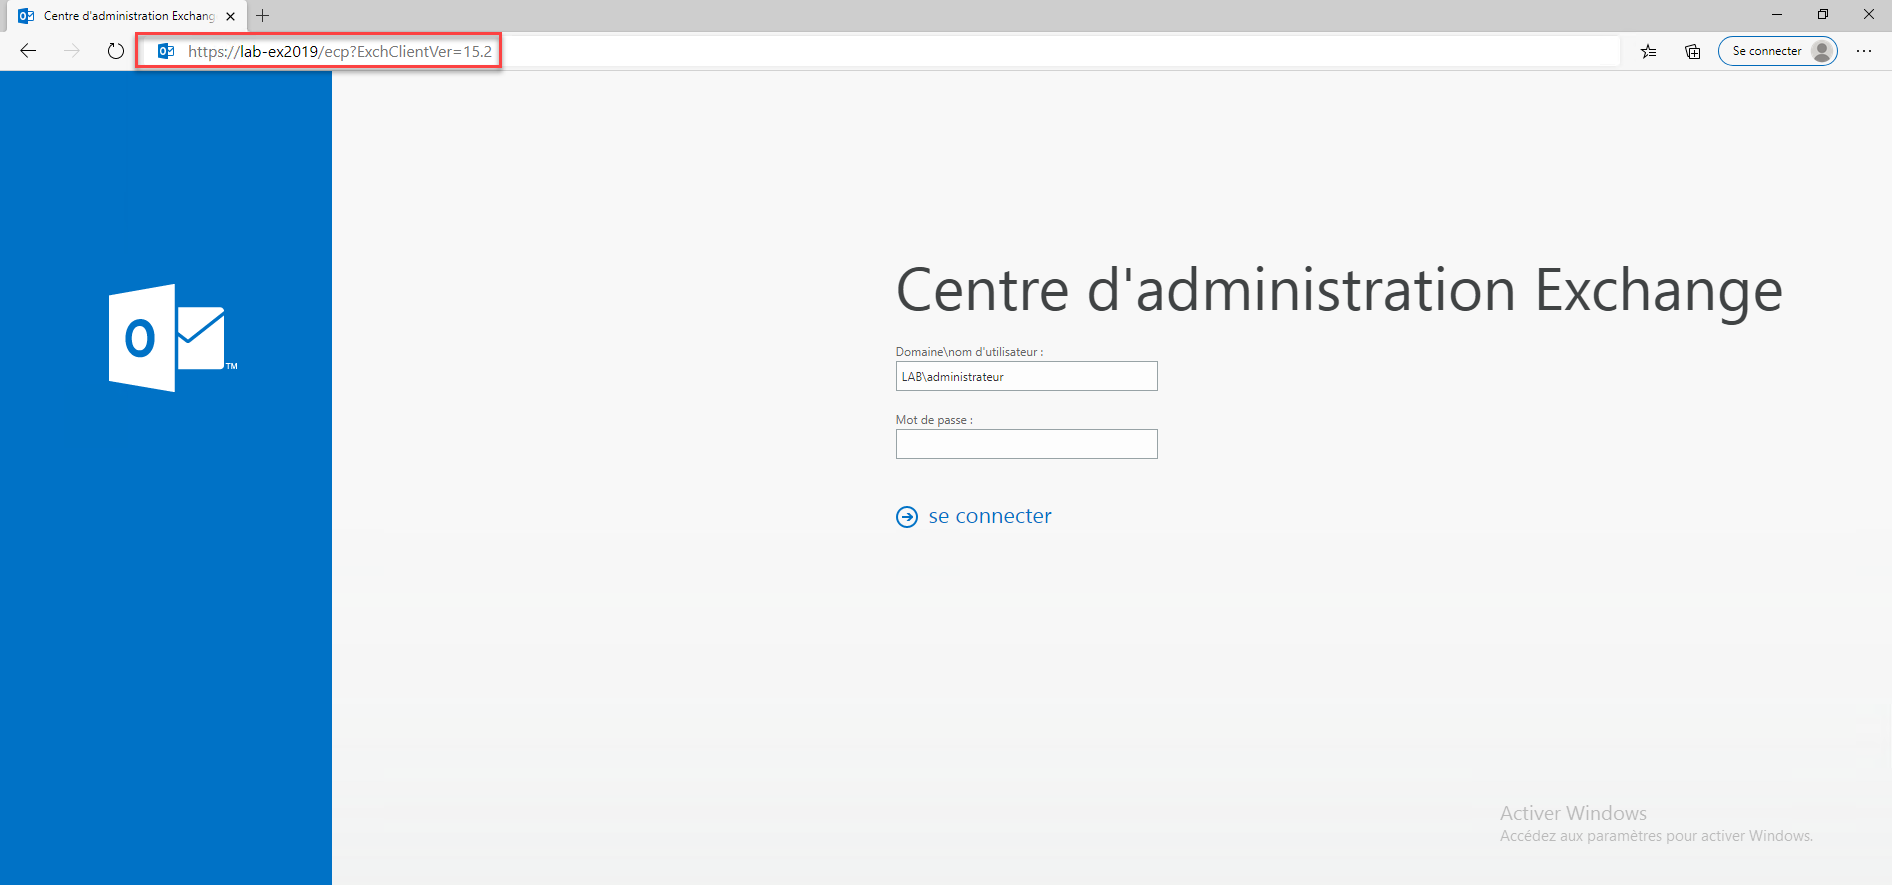
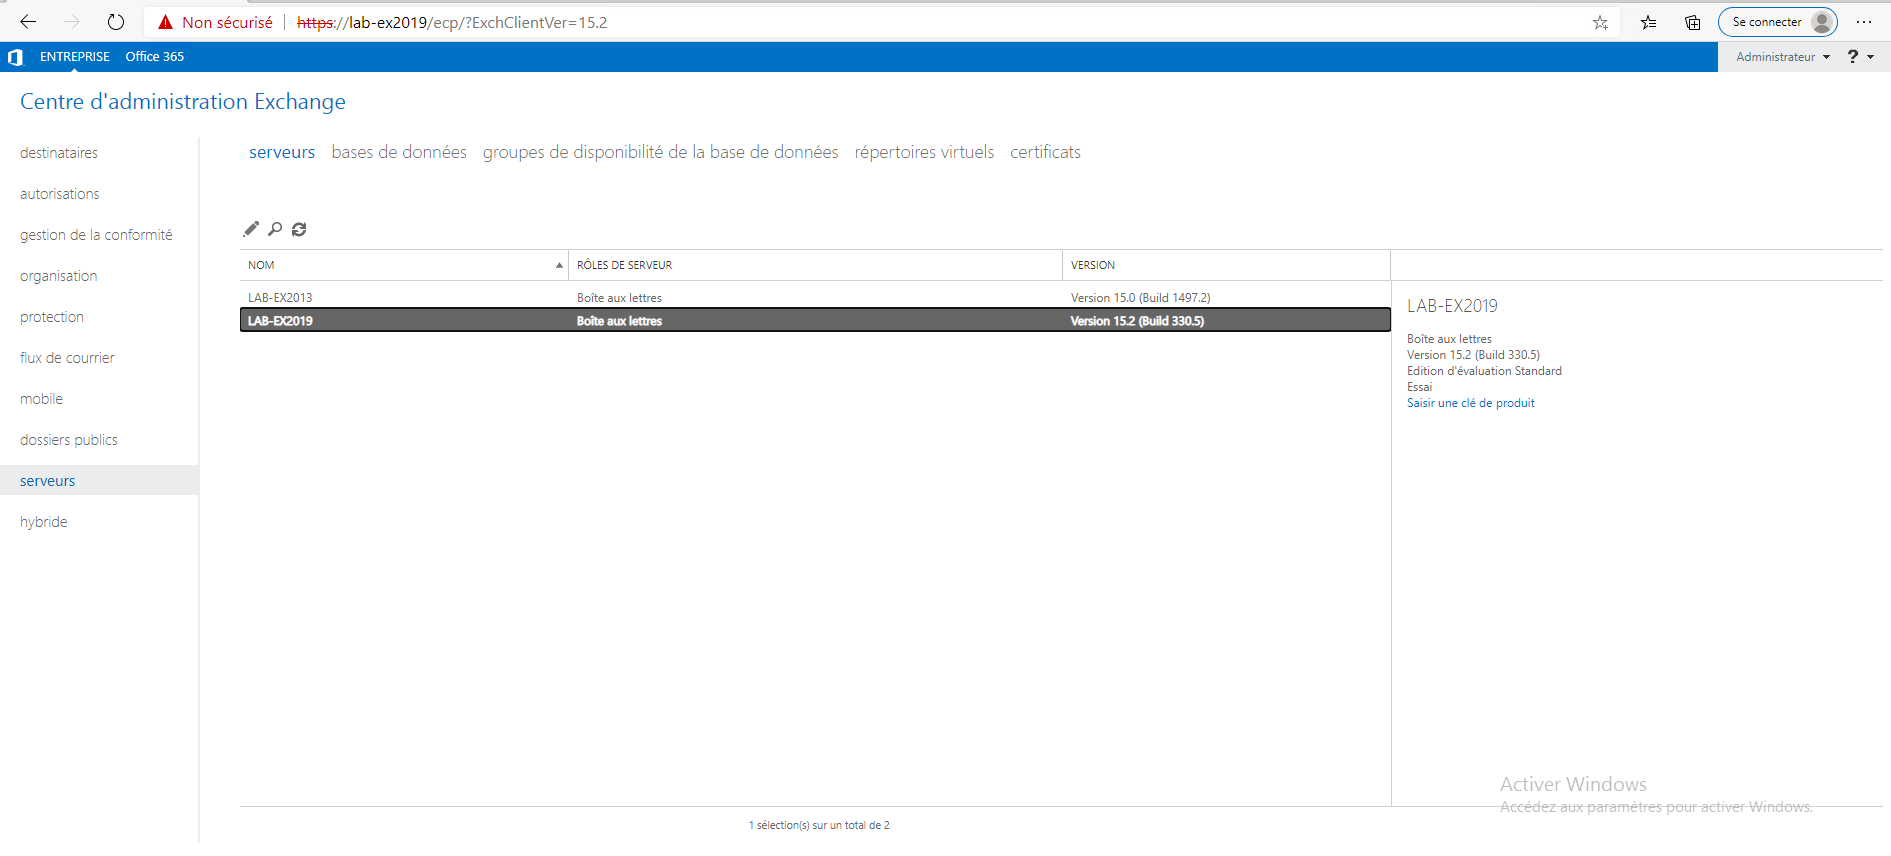
At the end of the installation, to access the ECP, use the following URL on: https: // server_exchange_2019/ecp? ExchClientVer = 15.2.
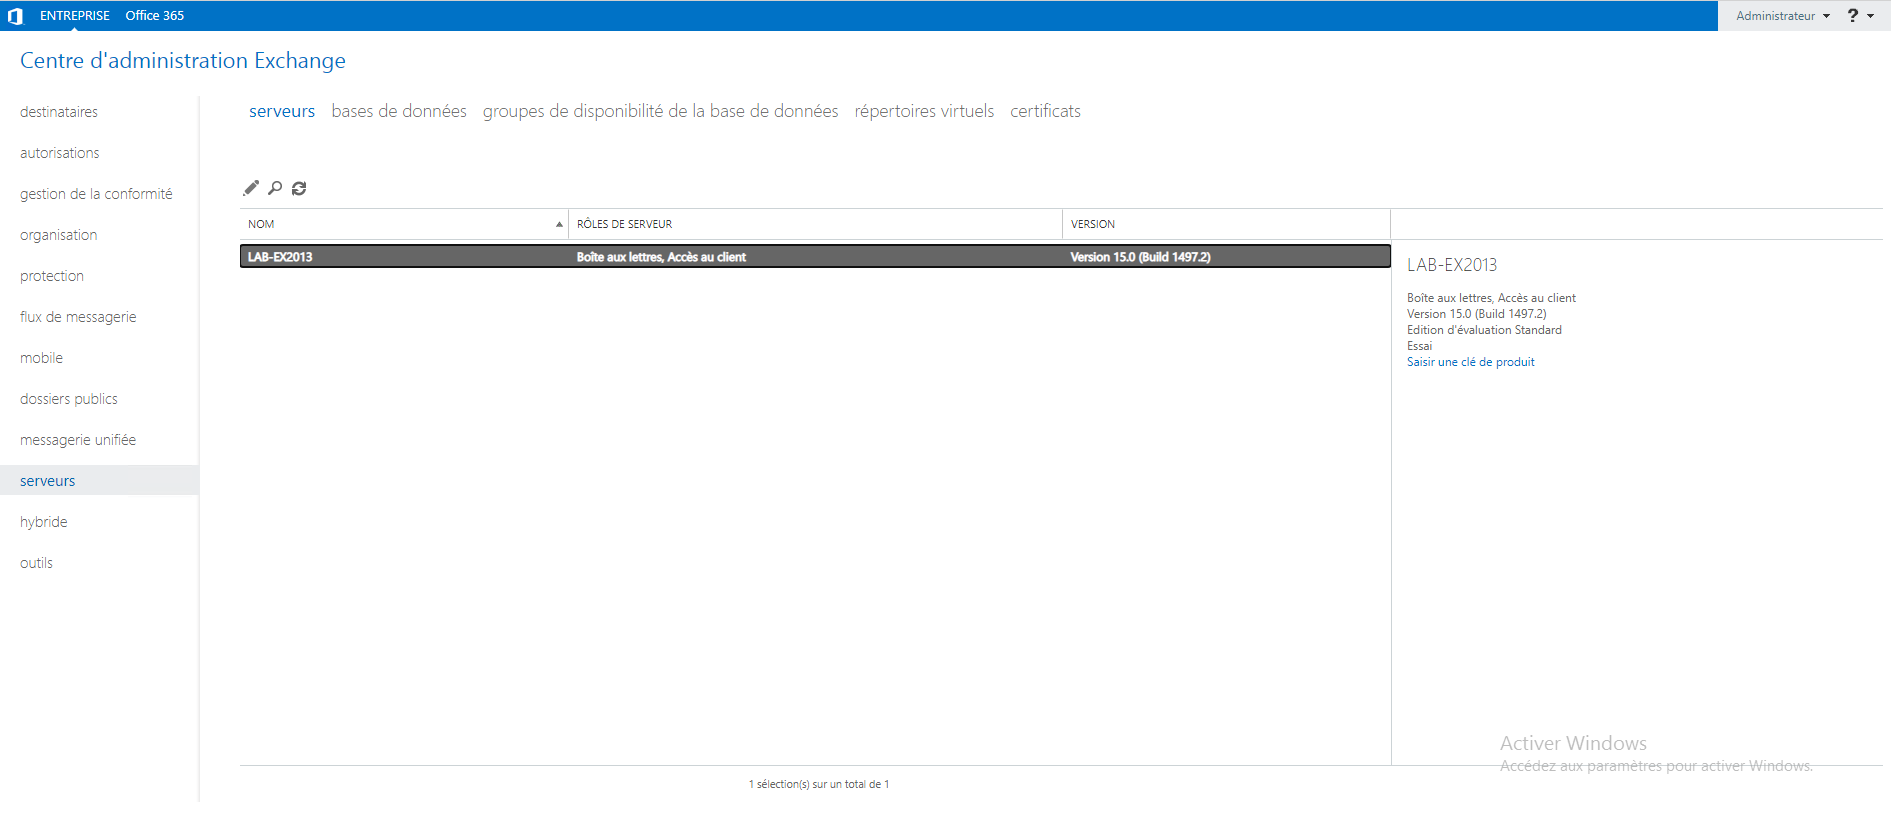
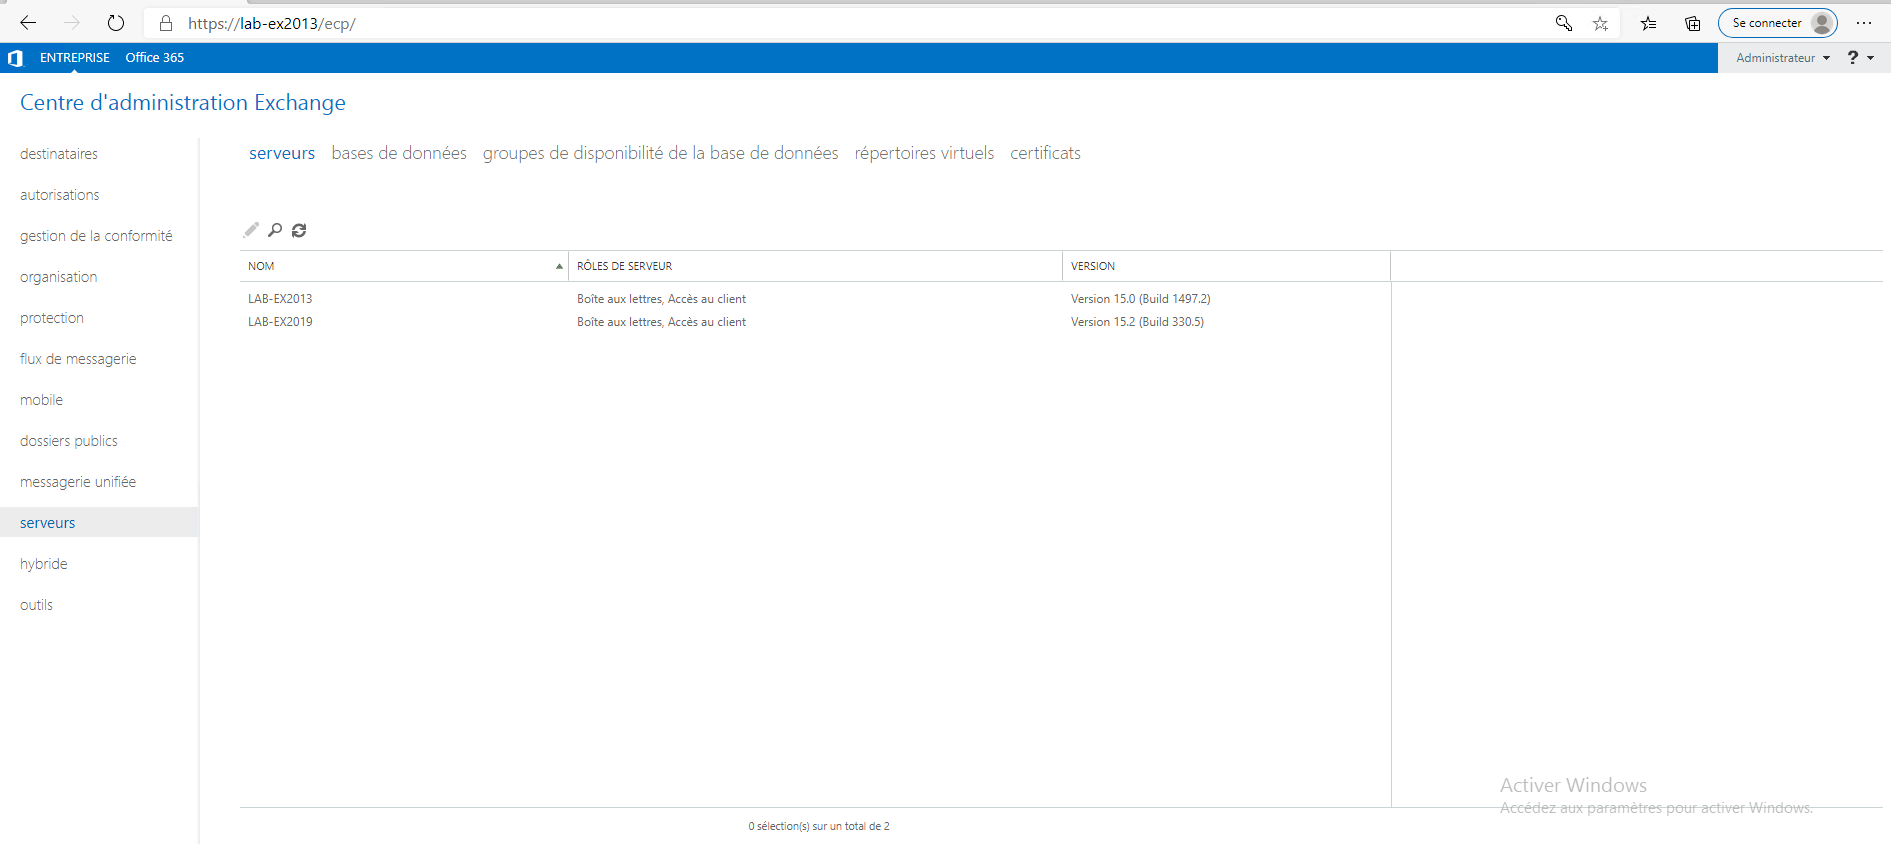
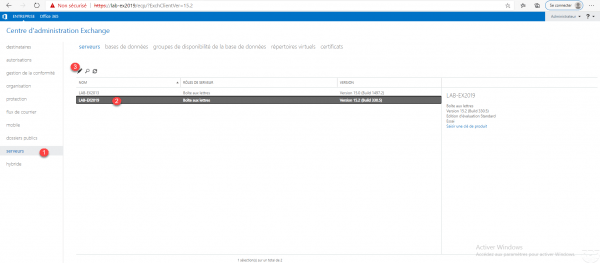
On both environments, check in the server part that all the Exchange servers are present.
Autodiscover configuration
The first item to configure or change is autodiscover, when installing Exchange 2019, an entry was added that points autodiscover to the Exchange 2019 server.
For now, this needs to point to a URL.
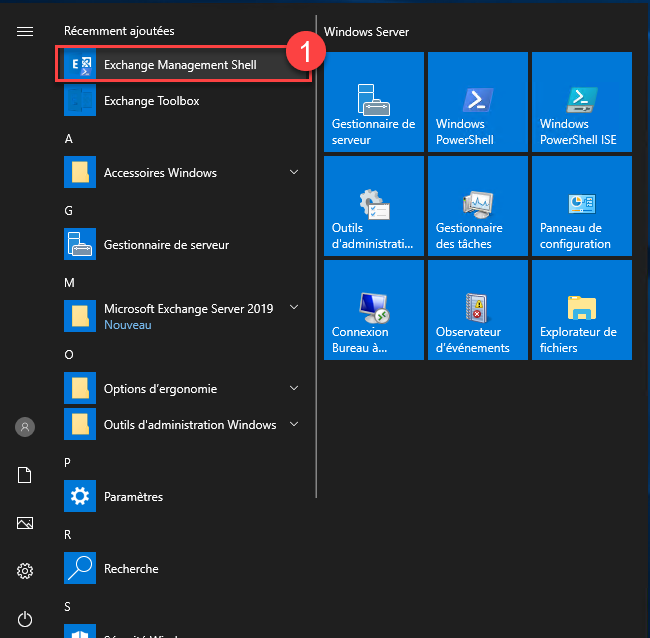
On the server where Exchange 2019 is installed, open the Exchange Management Shell 1.
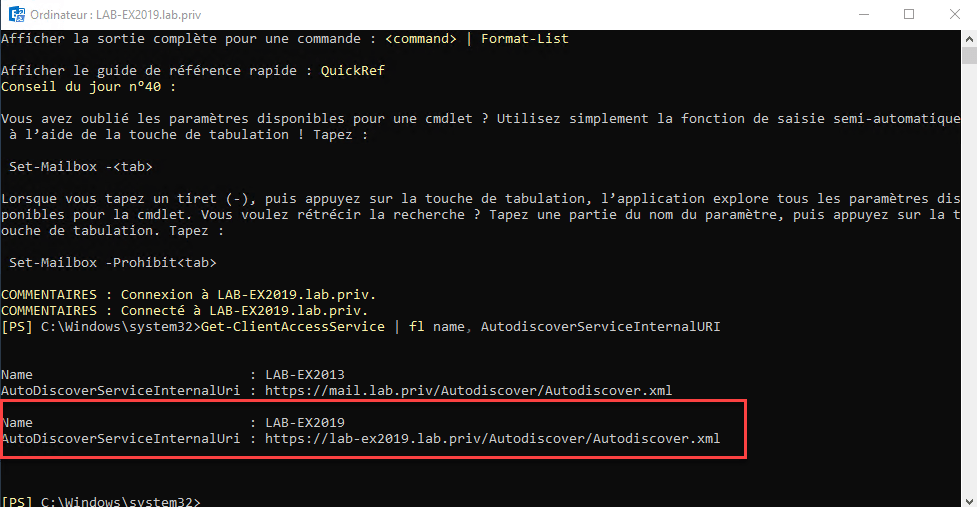
Enter the following command to display the SCP points:
Get-ClientAccessService | fl name, AutodiscoverServiceInternalURI
On the screenshot below, we see that a record points directly to the Exchange 2019 server.
Enter the line below to change the URL of autodiscover on the Exchange 2019 server. (Adapt the Identity and AutodiscoverServiceInternalURI parameter).
Set-ClientAccessService -Identity LAB-EX2019 -AutodiscoverServiceInternalURI https://mail.lab.priv/Autodiscover/Autodiscover.xml

Enter the following command again to verify the change:
Get-ClientAccessService | fl name, AutodiscoverServiceInternalURI

Preparing / Configuring Exchange 2019
Before migrating mailboxes, you must prepare / configure the Exchange 2019 environment with the “same” configuration so that it is transparent for users and to avoid a problem accessing the service.
Configure databases
This configuration depends on your environment, it is best practice to rename and move the default database to another disk.
Depending on your environment create the necessary databases.
Configure Directory URLs
This step is important, because it is this step that will allow you to configure the URLs identically on the two environments and make the migration transparent for users.
To help you use the following link: Exchange 2016: Installation and configuration – Page 12 to 18
Outlook Anywhere URL
In the servers 1 section of the ECP, select the Exchange 2019 server 2 and click on the edit icon 3.
In the server properties, click on Outlook Anywhere 1. You can see that the URL is the FQDN of the server 2.
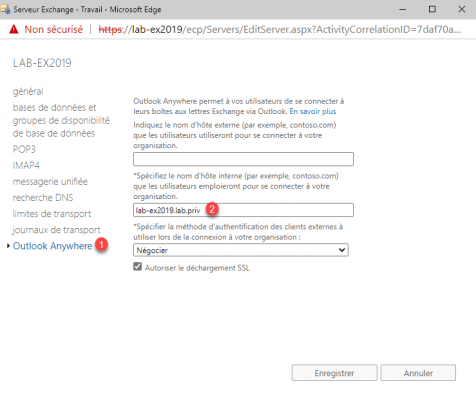
Enter the URL for accessing Exchange services 1 and click Save 2.
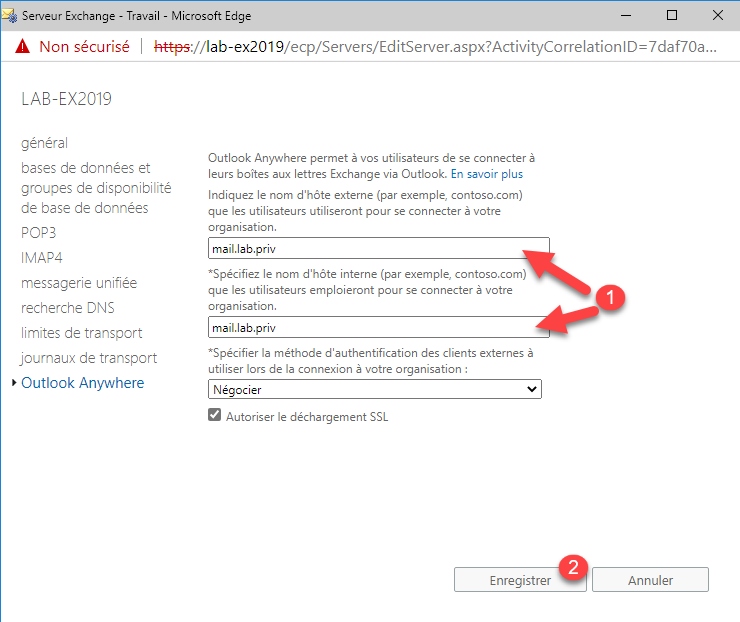
Outlook AnyWhere URL is configured.
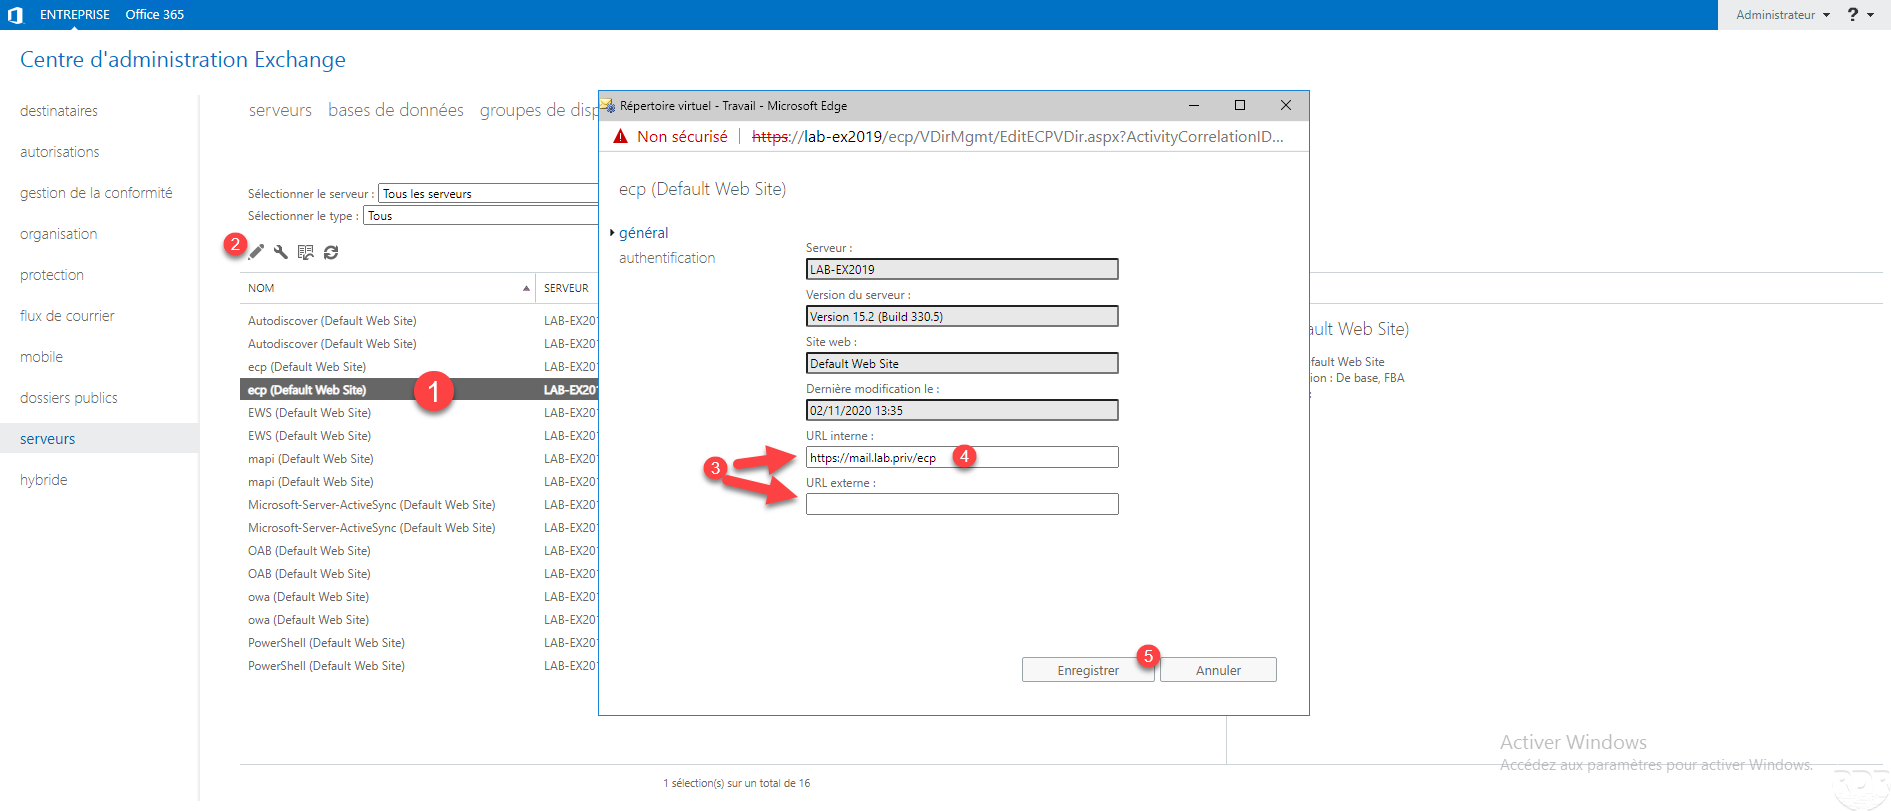
URLs of virtual directories
The same operation must be done for all of the Exchange 2019 virtual directories.
Still in the server part 1, click on virtual directories 2. On the screenshot below I have selected the directories to modify.
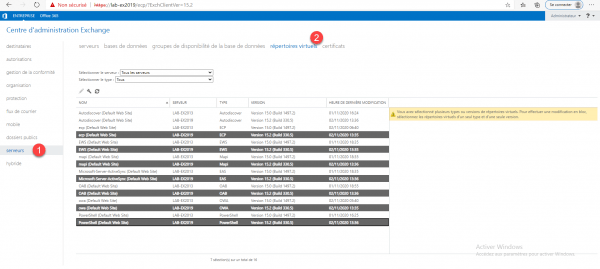
The Autodiscover directory does not have a URL to configure.
To modify the URL of a virtual directory, select 1, click on the modification icon 2, in the properties find the URL 3 fields, enter the configured URL 4 and click on Save 5.
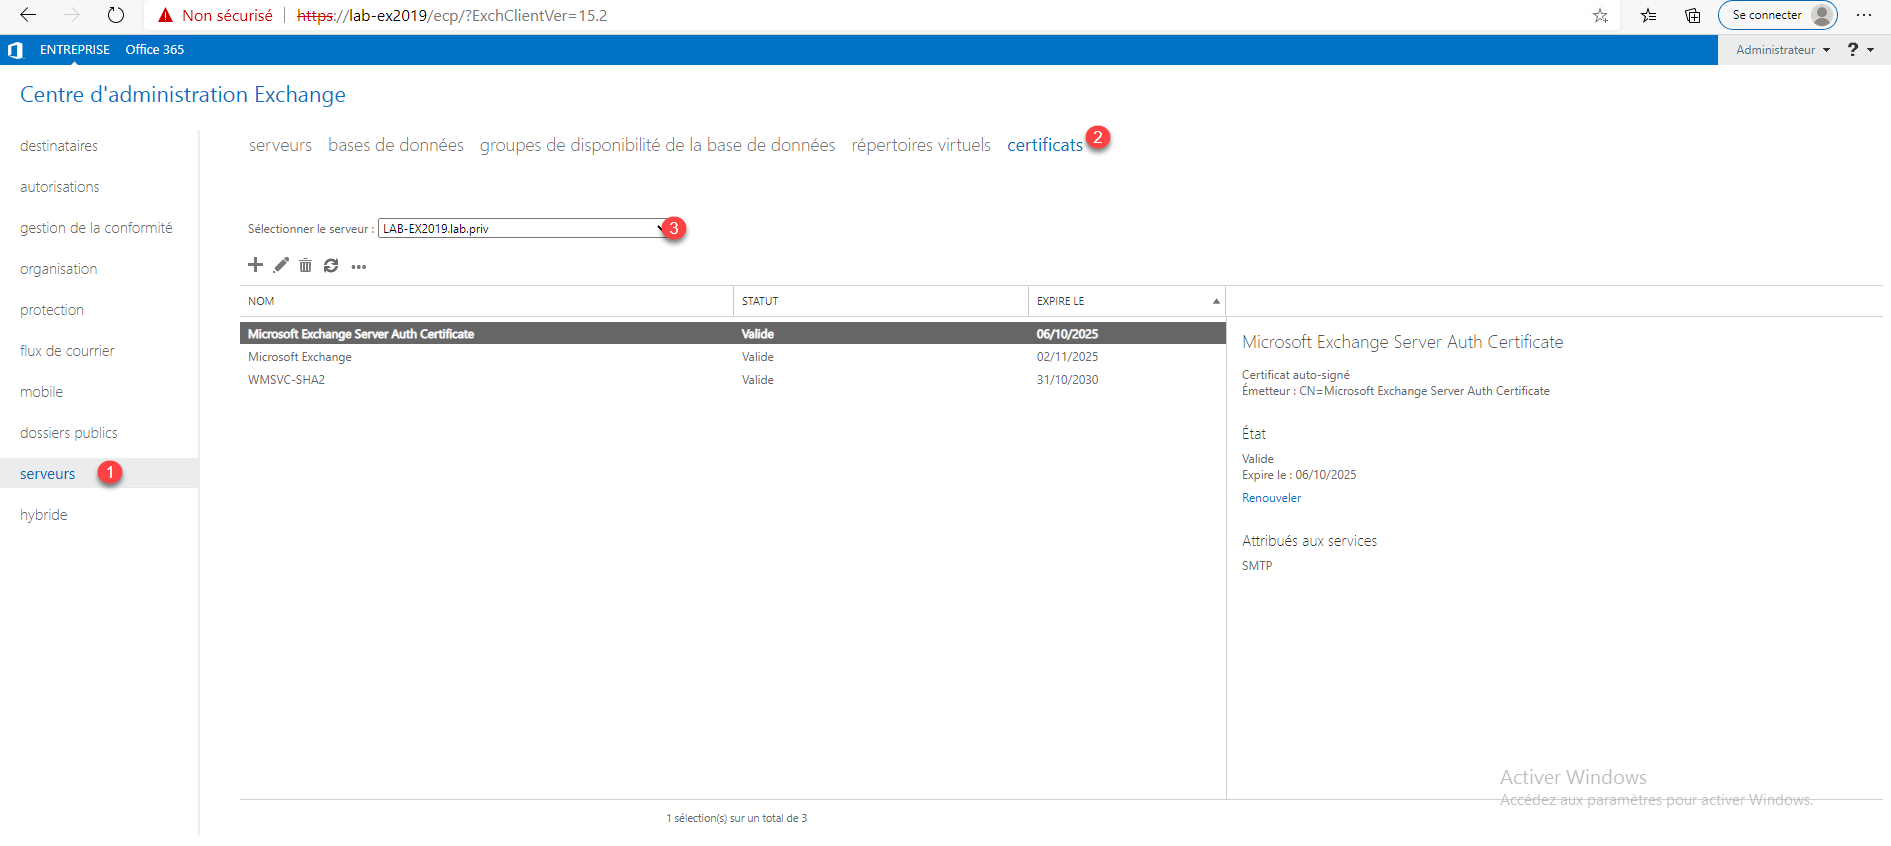
Import the SSL certificate
Now the URLs are configured, you have to import the corresponding SSL certificate.
Before importing the certificate, you must place the pfx file on a network share.
In the servers 1 part, go to certificates 2 and select the Exchange 2019 server 3.
Click on … 1 then on Import an Exchange certificate 2.

Enter the UNC path of the certificate file 1, enter the password 2 and click Next 3.
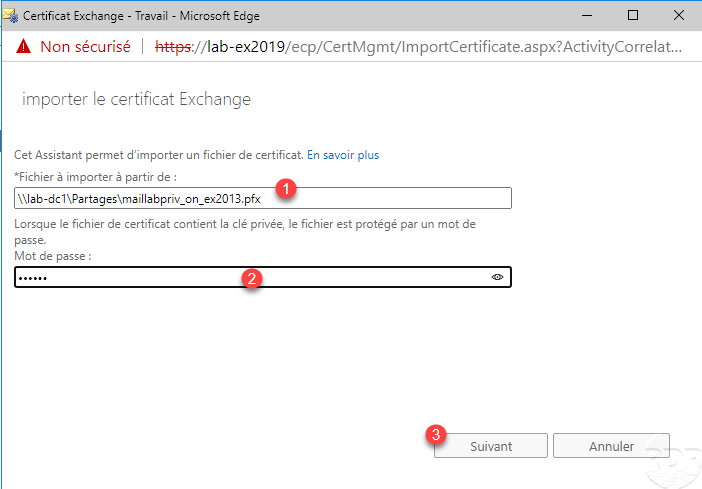
Add Exchange 2019 server 1 to install the certificate on it and click Finish 2.

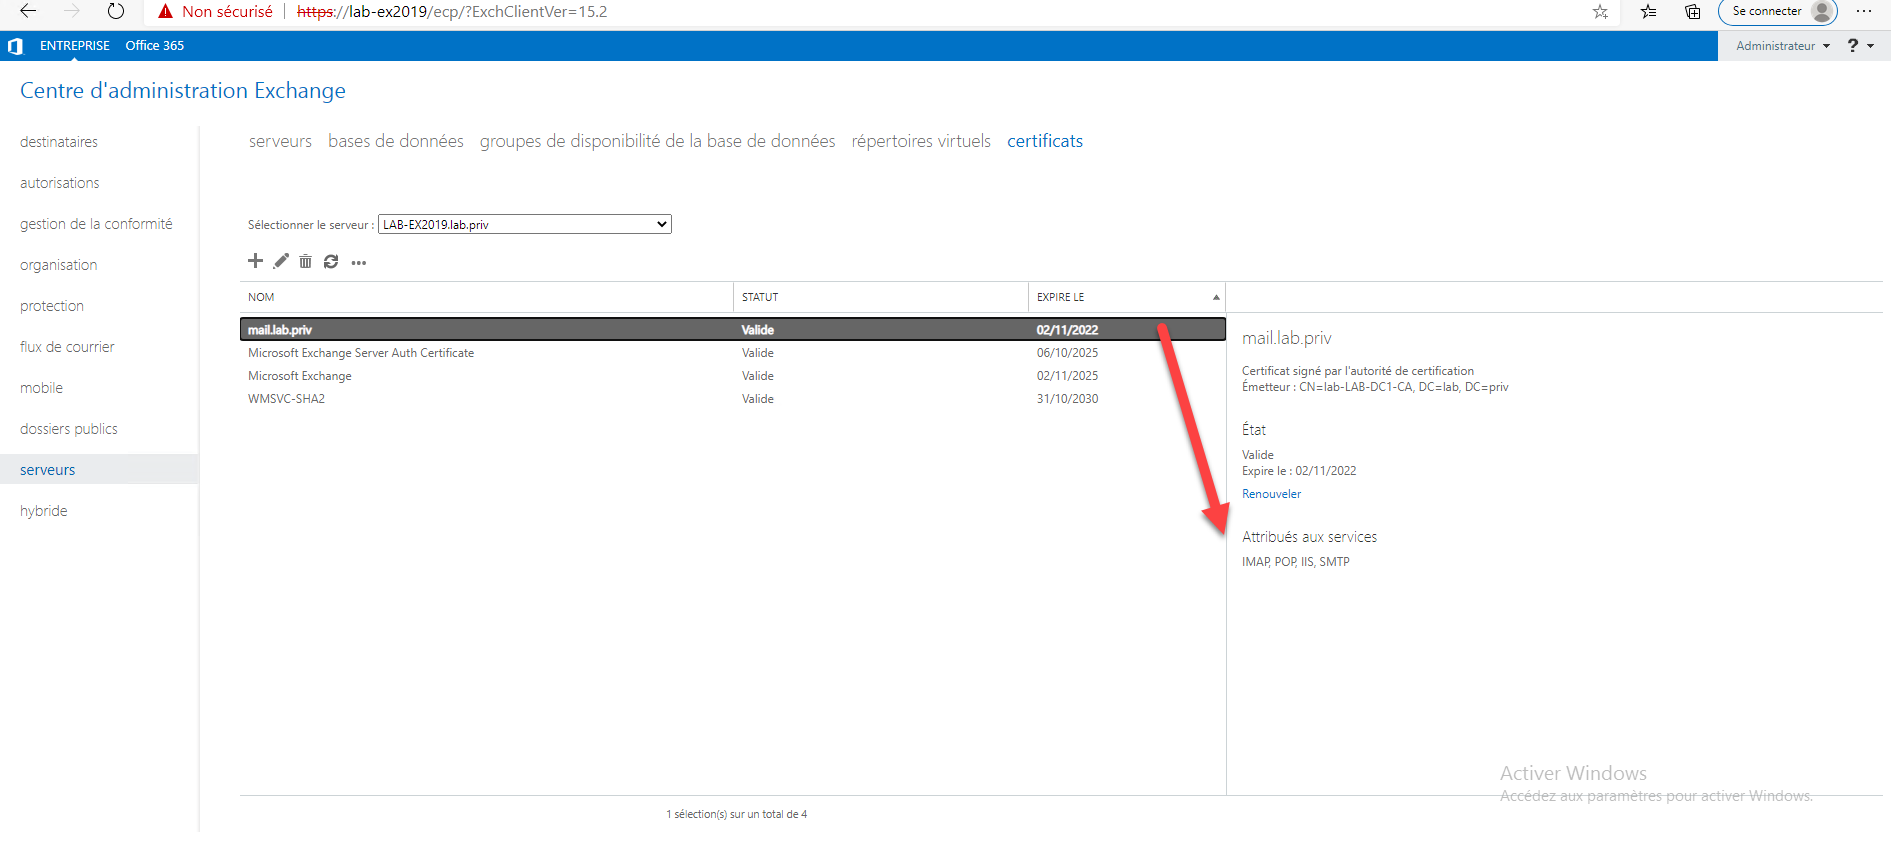
You must then assign the certificate to the different service, by going to these properties.
Configure send and receive connectors
We must now configure connectors to send email on the Internet and also reception.
Configure a Send connector: Exchange 2016: Installation and configuration – Page 13 to 18
Configure a Receive connector: Exchange: create a Receive connector
If in doubt, look at the configuration of your existing connectors on the Exchange 2013/2016 environment.
This part is important for sending email to the Internet and for receiving email from applications and devices
It is possible to use a PowerShell script to duplicate the receive connectors:
$OldServer = "SRV-EX2013"
$NewServer = "SRV-EX2019"

[array]$ReceiveConnectors = Get-ReceiveConnector -Server $OldServer | Where {$_.Name -notlike "Default $($OldServer)" -and $_.Name -notlike "Client $($OldServer)"}

$ReceiveConnectors | foreach {
    New-ReceiveConnector -Name $_.Name -RemoteIPRanges $_.RemoteIPRanges -bindings $_.Bindings -Banner $_.Banner -ChunkingEnabled $_.ChunkingEnabled -DefaultDomain $_.DefaultDomain -DeliveryStatusNotificationEnabled $_.DeliveryStatusNotificationEnabled -EightBitMimeEnabled $_.EightBitMimeEnabled -DomainSecureEnabled $_.DomainSecureEnabled -LongAddressesEnabled $_.LongAddressesEnabled -OrarEnabled $_.OrarEnabled -Comment $_.Comment -Enabled $_.Enabled -ConnectionTimeout $_.ConnectionTimeout -ConnectionInactivityTimeout $_.ConnectionInactivityTimeout -MessageRateLimit $_.MessageRateLimit -MaxInboundConnection $_.MaxInboundConnection -MaxInboundConnectionPerSource $_.MaxInboundConnectionPerSource -MaxInboundConnectionPercentagePerSource $_.MaxInboundConnectionPercentagePerSource -MaxHeaderSize $_.MaxHeaderSize -MaxHopCount $_.MaxHopCount -MaxLocalHopCount $_.MaxLocalHopCount -MaxLogonFailures $_.MaxLogonFailures -MaxMessageSize $_.MaxMessageSize -MaxProtocolErrors $_.MaxProtocolErrors -MaxRecipientsPerMessage $_.MaxRecipientsPerMessage -PermissionGroups $_.PermissionGroups -PipeliningEnabled $_.PipeLiningEnabled -ProtocolLoggingLevel $_.ProtocolLoggingLevel -RequireEHLODomain $_.RequireEHLODomain -RequireTLS $_.RequireTLS -EnableAuthGSSAPI $_.EnableAuthGSSAPI -ExtendedProtectionPolicy $_.ExtendedProtectionPolicy -ExtendedProtectionTlsTerminatedAtProxy $_.ExtendedProtectionTlsTerminatedAtProxy -SizeEnabled $_.SizeEnabled -TarpitInterval $_.TarpitInterval -Server $NewServer
}
Source : Copy Receive Connectors to a New Exchange Server (techgenix.com)
You must also remember to configure the firewall / MTA to authorize the new server to send and receive messages.
Switch access to Exchange 2019
Before moving on to the migration of mailboxes to Exchange 2019, we switch Outlook and Webmail access to Exchange 2019.
Before making the DNS change, it is possible to do tests from a computer by modifying the host file by indicating the DNS and the IP associated with the URL.
It is also possible to test the Webmail (OWA) by connecting directly with the FQDN name of the server to the web interface.
Once the tests are validated, modify the internal and external DNS record
Once the DNS records have been configured, configure the firewall and / or reverse proxy to send HTTP requests to the Exchange 2019 server.
Migration of mailboxes to Exchange 2019
Last step of the migration to Exchange 2019, the failover of mailboxes.
I strongly advise you to do it in PowerShell, I had a lot of problem going through the Migration tool in the ECP interface.
To perform the migration, we will use a PowerShell script that will move all the mailboxes from one database to another.
To summarize, we will ask to move the mailbox from an Exchange 2013/2016 database to an Exchange 2019 database.
Enter the line below from the Exchange 2019 server to do a migration (by adapting DBEX2013 and DBEX2019 to your environment):
Get-Mailbox -Database DBEX2013 | New-MoveRequest -TargetDatabase DBEX2019 -BatchName “EX20132EX2019”
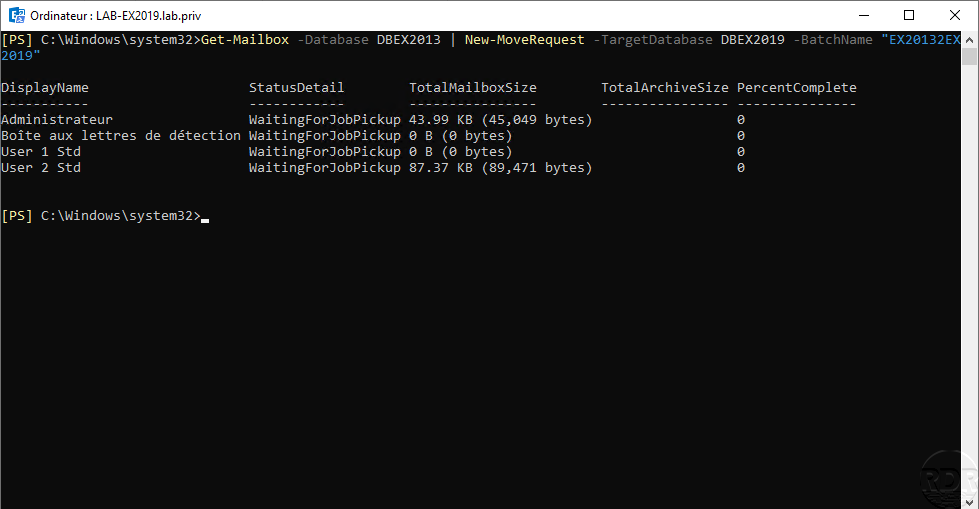
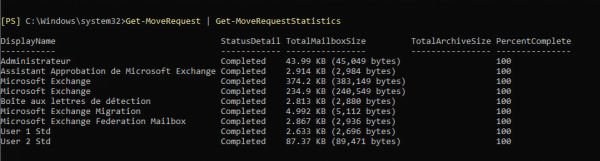
To follow the migration, you can enter the command: Get-MoveRequest

Once the migration is complete, the status changes to Completed.

It is possible to check the migration in the ECP, in the properties of a mailbox by looking at the database.

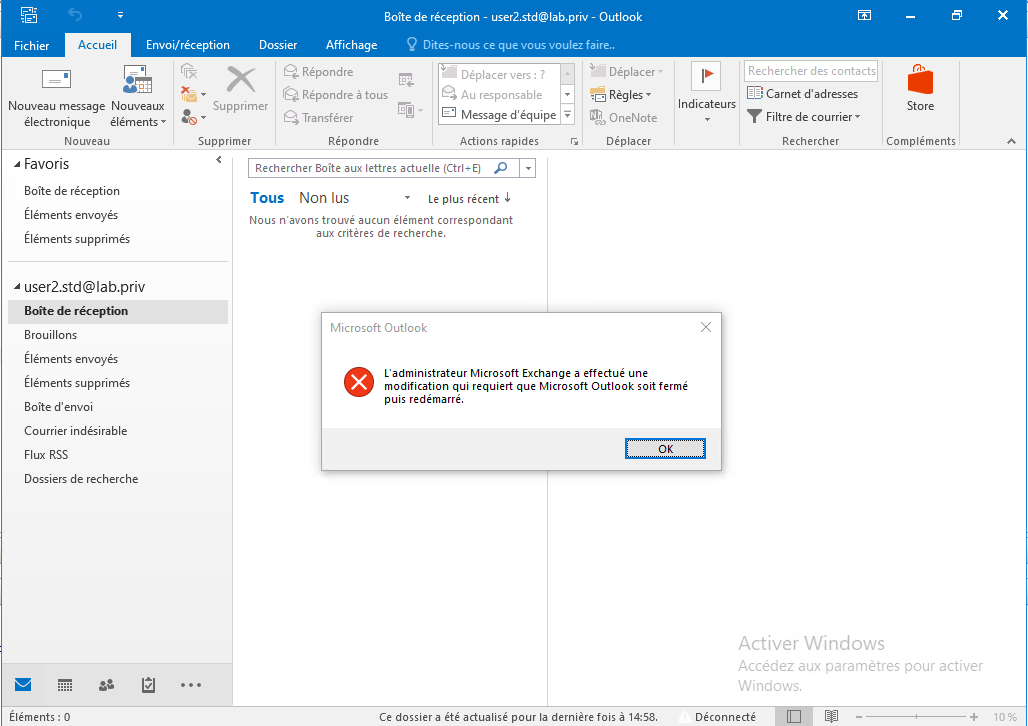
During migration if a user is open to Outlook, a message is displayed asking them to restart Outlook.
Repeat the operation for each database on Exchange 2013/2016 to migrate.
Trick :
If you can, before doing the migration, it is to test it by creating a test database on each server and to do a migration test with non “important” boxes.
Migration of arbitration boxes
The arbitration boxes are system boxes.
Enter the command below from the Exchange 2019 server to migrate them:
Get-Mailbox -Server LAB-EX2013 -Arbitration | New-MoveRequest
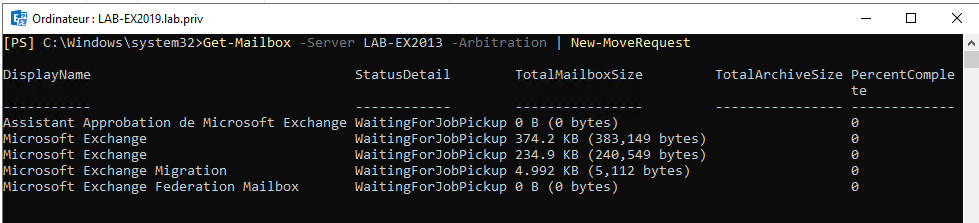
Use the Get-MoveRequest command to follow the progress:
Migration of public folders (optional)
If you are using public folders, they must also be migrated.
Migrate public folders from Exchange 2013 to Exchange 2016 or Exchange 2019
Decommission of Exchange 2013/2016
This is the last step in the migration, uninstalling Exchange 2013 from your environment.
I advise you to wait a week or two before uninstalling to make sure everything is working and you haven’t forgotten anything. However, what you can do is shut down the old server (s) before uninstalling.
In the case of a DAG, you must first remove it and then uninstall each server.
Exchange having a lot of connection with the Active Directory, it is very important to uninstall Exchange and especially not to delete the servers without decommission.
To uninstall Exchange 2013/2016, from the control panel / Uninstall or modify a program, right-click on Exchange and click on Uninstall.
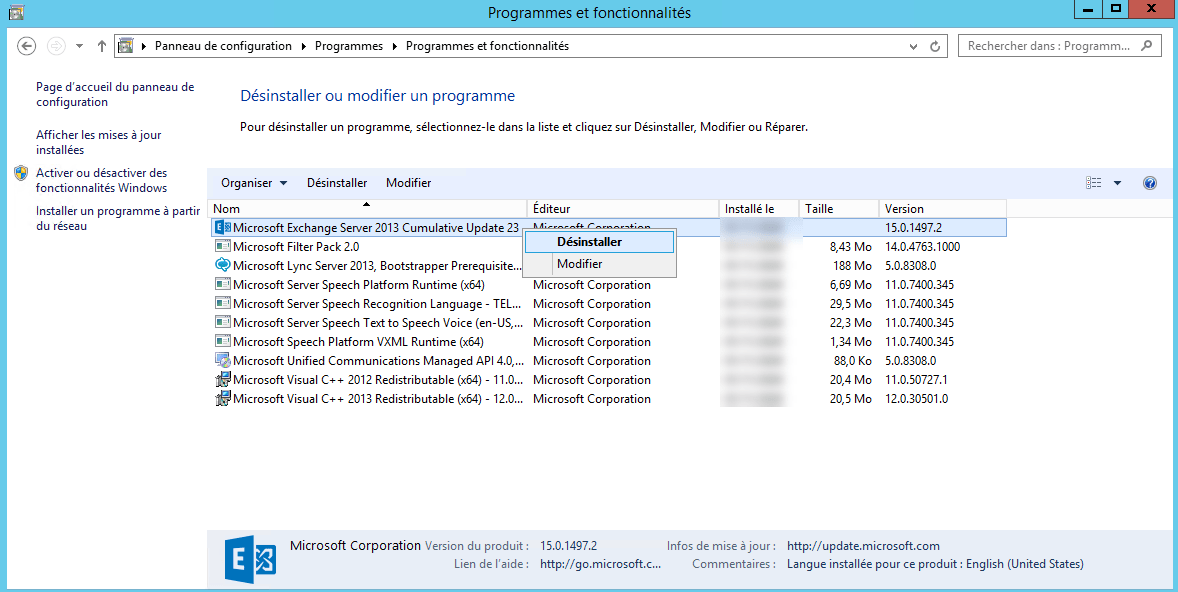
Follow the wizard for uninstallation.
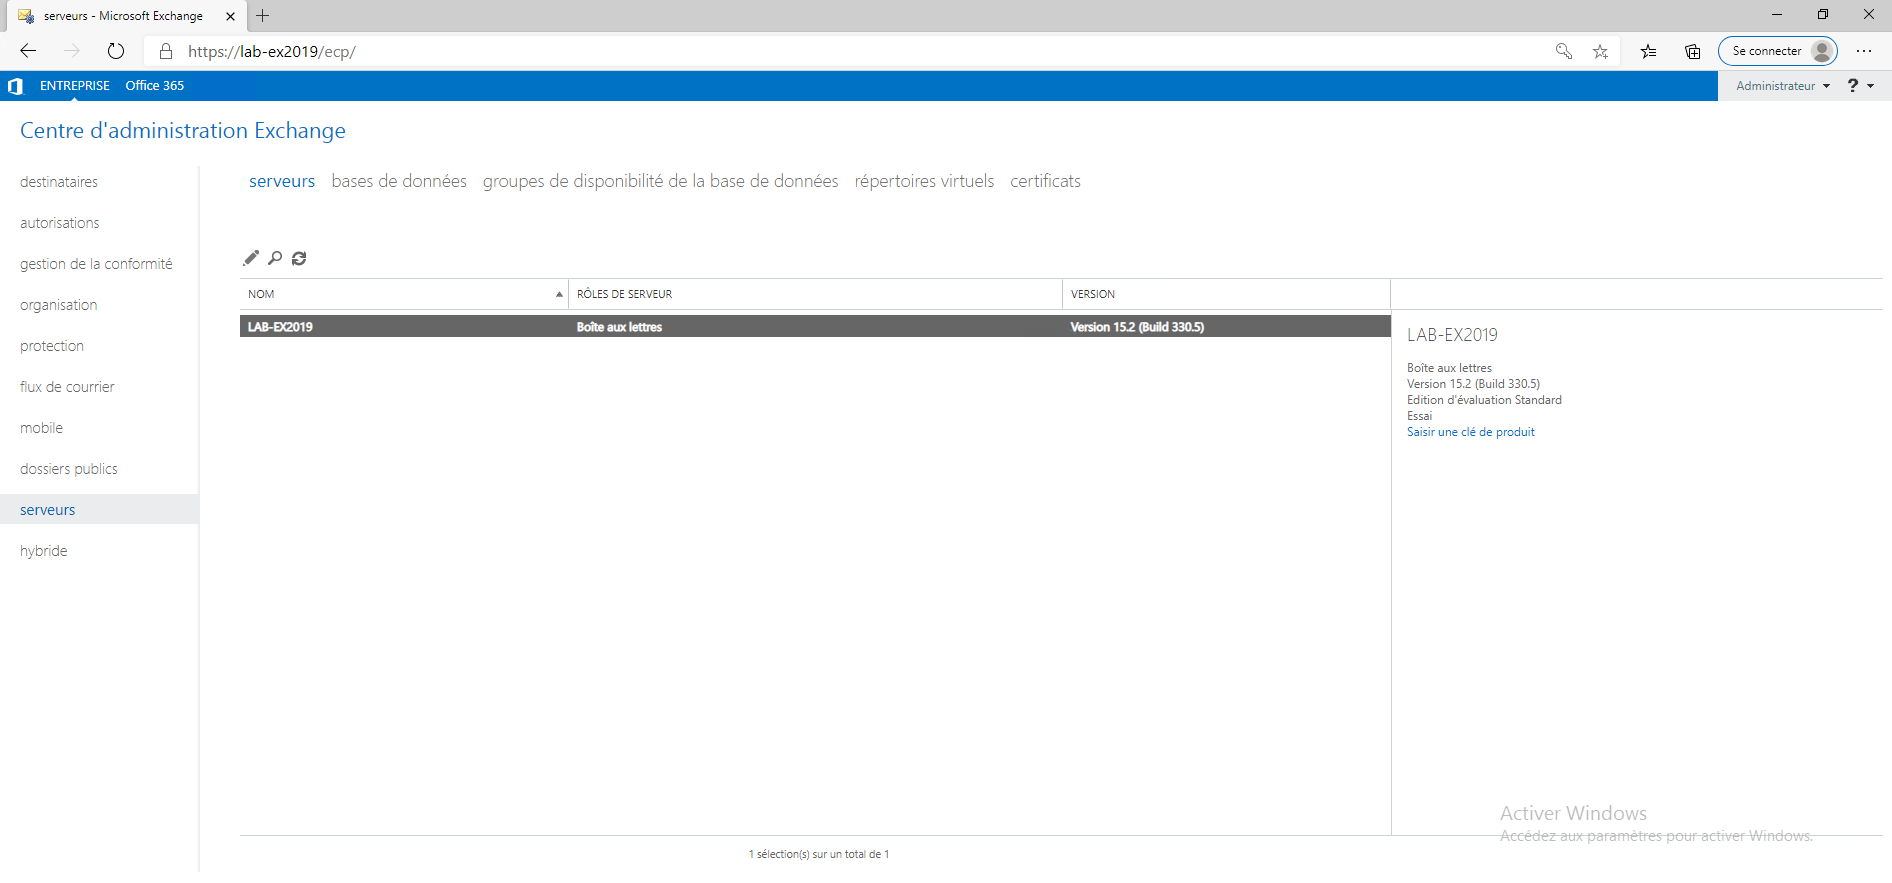
Once uninstalled, it is possible to access the Exchange 2019 ECP without the version settings.
In the servers part, the decommissioned server (s) are no longer present.
Conclusion
Hope this tutorial helps you with your Exchange migration.
It is not a complicated operation, but it should be planned carefully so that no item is missed.
It is possible to use this tutorial for a migration from Exchange 2013 to 2016 or Exchange 2010 to 2013/2016.
For a migration from Exchange 2010 to 2019, it is necessary to do an intermediate migration to Exchange 2013 or 2016.
