In this tutorial, I’ll explain how to use Robocopy, the file-copying tool built into Windows.
Powerful and flexible, Robocopy lets you reliably perform backups, synchronizations, or data migrations, even with large volumes.
Together, we’ll cover the basic commands, the most useful options, and a few practical examples to help you save time in your daily work.
Copying files is a daily task for any system administrator or advanced user. However, when it comes to managing large volumes of data, synchronizing folders, or performing automated backups, standard Windows tools quickly reach their limits.
That’s where Robocopy—short for Robust File Copy—comes in. Natively integrated into Windows, this command-line utility offers powerful and precise features for copying, moving, or synchronizing files while preserving attributes, NTFS permissions, and the directory tree structure.
Table of Contents
Introduction to Robocopy
Robocopy, short for Robust File Copy, is an advanced file-copying tool developed by Microsoft. It was designed to offer a more efficient and reliable alternative to the standard COPY or XCOPY commands, particularly for system administrators and professional environments where stability and error recovery are essential.
Integration with Windows Systems
- Windows NT 4.0 / 2000 / XP: available only through the Resource Kit Tools
- Windows Vista: first native integration into Windows, with no additional installation required
- Windows 7, 8, 10, 11, and Windows Server: included by default in the system, accessible via the Command Prompt (cmd) or PowerShell
As a result, Robocopy is now one of the standard Windows administration tools and remains an indispensable go-to solution for any data backup, migration, or synchronization task.
Key Benefits
- Automatic resumption in the event of a network or system interruption
- Preservation of metadata and NTFS permissions
/MTMultithreaded copying (optional) to speed up transfers- Exclusion of files/folders based on specific criteria
- Generation of detailed logs for tracking operations
- Ability to automate using scripts or scheduled tasks
How to Use Robocopy on Windows
Robocopy uses the following syntax:
robocopy [source] [destination] [*.*] [options]source: The folder you want to copy; it can be a local folder or a location in UNC format.destination: The destination where you want to copy the data; this can be a local folder or a UNC path.*.*: Indicates that you want to copy all files.options: parameters
We’ll start with a basic example, then gradually add parameters to master Robocopy’s main features step by step.
\\server\Backup\DocumentsThe example here will be to “back up” the folderC:\Documentsto a network share.
“Simple” copy without parameters
robocopy "C:\Documents" "\\server\Backup\Documents\"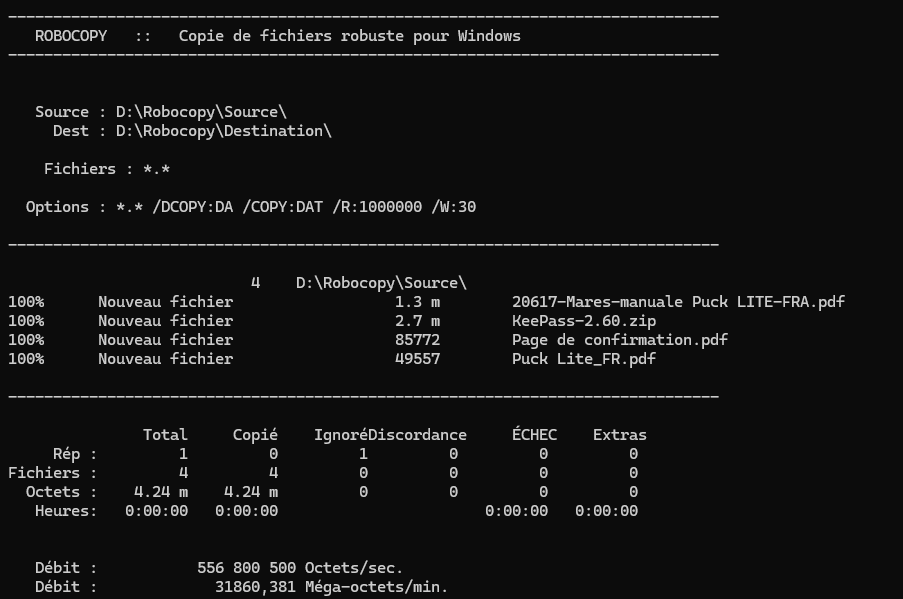
This command:
- Copies all files from the directory
C:\Documentsonly to\\server\Backup\Documents\; by default, Robocopy is not recursive- Ignores files that already exist (by default, Robocopy only copies what has changed)
- Displays a summary at the end (files copied, ignored, errors, etc.)
Add recursion with the option /e
To enable recursion for the copy, there are two options:
/s: Copies subfolders and their contents if the folder is not empty/e: Copies subfolders and their contents, even if the folders are empty
To include all subfolders, even those that are empty:
robocopy "C:\Documents" "\\server\Backup\Documents\" /e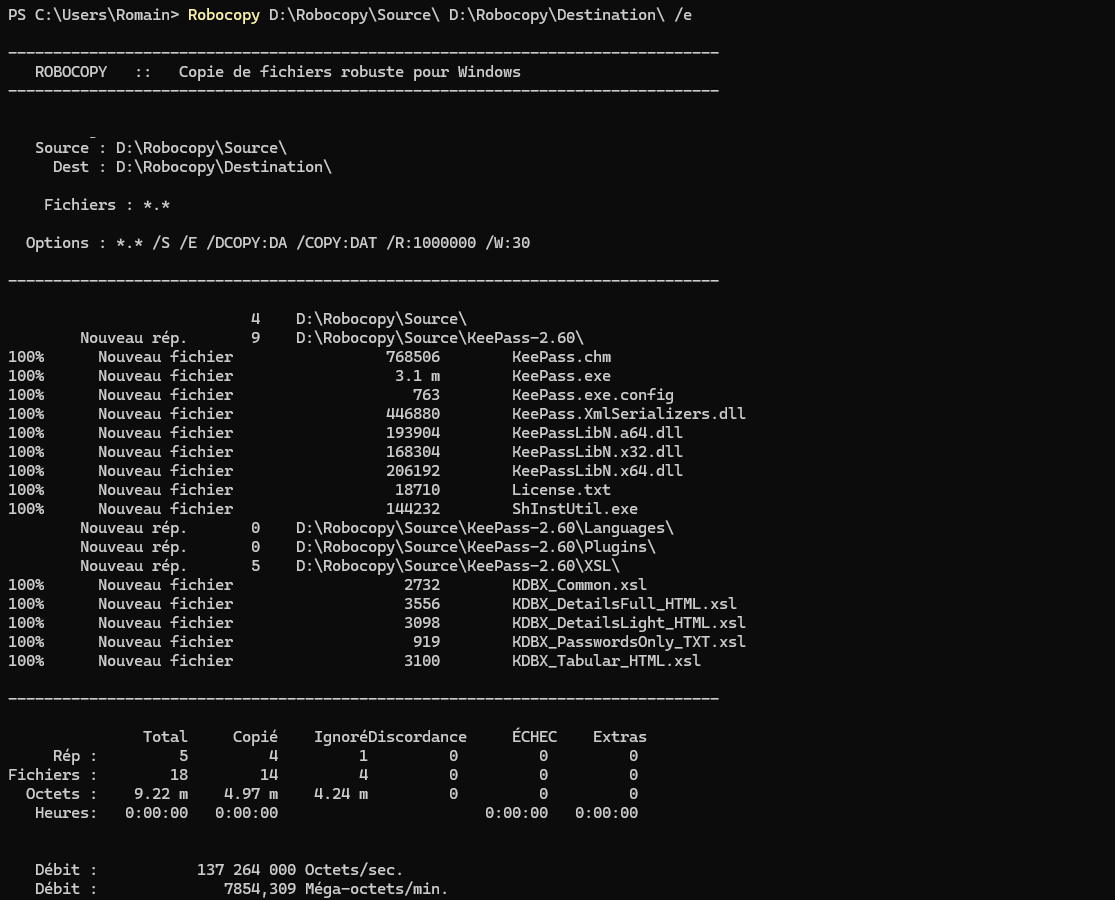
This time, the option
/eallowed us to copy the Keepass folder and its contents.In the screenshot, you can see that some files were skipped because they were already present in the destination folder.
Preserve attributes and permissions: /COPYALL
/COPYALLWhen migrating a file server—whether for an upgrade or a move to another server—you generally want to preserve all folder and file information (NTFS permissions, metadata, attributes, owners, etc.). To do this, use the option.
robocopy "C:\Documents" "\\server\Backup\Documents\" /e /COPYALLEquivalent to
/COPY:DATSOU(Data, Attributes, Timestamps, NTFS Security, Owner, Audit Information)An essential option for file server migrations.
Mirror mode: /MIR
Mirror mode ensures that the destination location is identical to the source; that is, if a file is deleted from the source location, it will also be deleted from the destination location.
This option is also useful when migrating file servers, since multiple Robocopy operations are typically performed during this type of migration.
robocopy "C:\Documents" "\\server\Backup\Documents\" /e /COPYALL /MIRWarning
This option deletes any files from the destination that are not present in the source.
Excluding Folders and Files
To exclude folders or files from the copy, use the following options:
/XFTo exclude files/XDTo exclude folders
Let’s start with files:
/XF *.tmp: Ignores all files with the .tmp extension./XF backup.bak: Ignores all files named backup.bak./XF C:\Documents\backup.bak: specifically ignores the file C:\Documents\backup.bak/XF *.tmp *.bak: Ignores files with the .tmp or .bak extension.
Exclude folders:
/XD Backup: Ignores all folders named “Backup”/XD "C:\Documents\Backup": specifically ignores the folder C:\Documents\Backup/XD "C:\Documents\Backup" "C:\Documents\Temp": specifically ignores the folders C:\Documents\Backup and C:\Documents\Temp
Example:
robocopy "C:\Documents" "\\server\Backup\Documents\" /e /COPYALL /MIR /XF *.tmp *.bak /XD "C:\Documents\Backup" "C:\Documents\Temp"You can also write the command with multiple/XF and/XD :
robocopy "C:\Documents" "\\server\Backup\Documents\" /e /COPYALL /MIR /XF *.tmp /XF *.bak /XD "C:\Documents\Backup" /XD "C:\Documents\Temp"For example, if you only want to copy files with the .pdf extension:
robocopy "C:\Documents" "\\server\Backup\Documents\" *.pdf /e /COPYALL /MIRCreate a copy log: /LOG
/LOG:C:\emplacement\fichier.logWe’ll now discuss logs with Robocopy; to do this, you need to add the option.
This gives us:
robocopy "C:\Documents" "\\server\Backup\Documents\" /e /COPYALL /MIR /XF *.tmp *.bak /XD "C:\Documents\Backup" /LOG:C:\emplacement\fichier.logBy default, when the option/LOGis enabled, progress is no longer displayed in the command window; you must add the /TEE option to get both on-screen and file output.
robocopy "C:\Documents" "\\server\Backup\Documents\" /e /COPYALL /MIR /XF *.tmp *.bak /XD "C:\Documents\Backup" /TEE /LOG:C:\emplacement\fichier.logWhen Robocopy writes logs to a file, it overwrites the file’s contents; to append the logs to the end, use the /LOG+:C:\emplacement\fichier.log
Control Robocopy’s behavior in case of failure with/R and /W
When Robocopy cannot copy a file because it is locked by an application, by default it will retry 1,000,000 times with a 30-second delay between each attempt, which can effectively result in an “infinite loop”
To control Robocopy’s behavior, we’ll use the (Retry) and /W (Wait) options/R.
- /R: number of attempts
- /W: wait time in seconds between each attempt
This results in:
robocopy "C:\Documents" "\\server\Backup\Documents\" /e /COPYALL /MIR /XF *.tmp *.bak /XD "C:\Documents\Backup" /TEE /W:1 /R:1 /LOG:C:\emplacement\fichier.logIn this command, Robocopy will make a new attempt after waiting 1 second.
Optimizing Robocopy Performance with /MT
To wrap up the configuration of the Robocopy command example, we’ll optimize performance. Robocopy is multi-threaded, which allows it to process multiple file copies simultaneously within a single command.
By default, the value is 8. Depending on the performance of the source and destination (CPU, RAM, and I/O), this value can be increased up to 128.
robocopy "C:\Documents" "\\server\Backup\Documents\" /e /COPYALL /MIR /XF *.tmp *.bak /XD "C:\Documents\Backup" /TEE /W:1 /R:1 /MT:24 /LOG:C:\emplacement\fichier.logIn the command, Robocopy will be run with 24 threads (
/MT:24).
Practical Examples of Using Robocopy
Now that we’ve covered the basic options for Robocopy, here are a few examples of how to use it.
Backing up personal folders
Regularly back up the Documents folder to an external drive or network drive:
robocopy "C:\Users\Romain\Documents" "E:\Sauvegarde\Documents" /MIR /R:3 /W:5 /LOG+:"C:\Logs\backup_docs.log"
Details:
/MIR→ The backup is an exact copy of the source folder/R:3 /W:5→ Limits the number of retry attempts in case of an error (useful if a file is locked)/LOG+→ Appends the session log to the existing file
Run this as a Windows scheduled task every time you log out.
Backup to a network share
Copies files to a backup server accessible via UNC (network path):
robocopy "D:\Projets" "\\serveur-backup\partage\Projets" /E /Z /R:2 /W:3 /LOG:"C:\Logs\backup_reseau.log"
Details:
\\serveur-backup\partage\Projets→ UNC path to the destination/Z→ Enables restartable mode (useful if the network goes down during the transfer)/E→ Recursive copy/Rand/W→ control over behavior in case of an error
Exclude certain folders or files
Ignore temporary files and unnecessary subfolders:
robocopy "C:\Données" "D:\Sauvegarde" /E /XD "C:\Données\Temp" "C:\Données\Cache" /XF *.tmp *.bak /LOG:"C:\Logs\exclusion.log"
Details:
/XD→ excludes folders (hereTempandCache)/XF→ excludes files based on a pattern (*.tmp,*.bak)
Migrate a file server
Here is an example of a command I use to migrate file servers:
robocopy "D:\Services" "\\s-new-file-servers\d$\Services" /mir /E /copyall /R:1 /W:1 /XA:ST /XD "D:\Services\Scans" /XF "~$*.*" /TEE /MT:24 /LOG+:C:\Temp\Migration-File-Server.logDetails:
/MIR→ Mirroring folders: During a migration, we typically make multiple copies (synchronization); this allows us to delete files on the destination server if they have been deleted on the source/E→ Copies subfolders, even if they are empty/COPYALL→ Copies all folder and file information (NTFS permissions, metadata, etc.)/R:1→ If a copy fails, retry/W:1→ Waits one second between each new attempt/XA:ST→ Excludes system and temporary files/XD "D:\Services\Scans"→ Excludes the D:\Services\Scans folder from the copy/XF "~$*.*"→ Excludes files that start with: ~$, which are usually temporary Word or Excel files./TEE→ Display the logs on screen in addition to the file output/MT:24→ 24 parallel threads/LOG+:C:\Temp\Migration-File-Server.log→ Appends logs to the end of the file.
Using Robocopy in Scripts
It is entirely possible to use Robocopy in scripts.
Robocopy batch script
Here is an example of a batch script using Robocopy.
@echo off
set SRC=C:\Users\Romain\Documents
set DST=\\serveur-backup\archives\Documents
set LOG=C:\Logs\backup_%date:~-4,4%-%date:~3,2%-%date:~0,2%.log

echo === DEMARRAGE SAUVEGARDE %date% %time% ===  %LOG%
robocopy "%SRC%" "%DST%" /MIR /COPYALL /R:3 /W:5 /MT:16 /LOG+:"%LOG%"
echo === SAUVEGARDE TERMINEE %date% %time% ===  %LOG%
Robocopy PowerShell script
The same script in PowerShell
# Variables
$Source = "C:\Users\Romain\Documents"
$Destination = "\\serveur-backup\archives\Documents"
$LogPath = "C:\Logs"
$Date = Get-Date -Format "yyyy-MM-dd_HH-mm"
$LogFile = Join-Path $LogPath "backup_$Date.log"

# Verifie si le dossier source existe
if (Test-Path $Source) {
    Write-Host "Demarrage de la sauvegarde..."

    # Execution de Robocopy
    robocopy $Source $Destination /MIR /COPYALL /R:3 /W:5 /MT:16 /LOG:$LogFile

    Write-Host "Sauvegarde terminee. Journal enregistre dans $LogFile"
} else {
    Write-Host "Le dossier source $Source n existe pas !" -ForegroundColor Red
}
Output codes
If you want to “refine” your scripts, here are the Robocopy output codes
| Value | Description |
|---|---|
| 0 | No files were copied. No errors occurred. No files had consistency issues. The files already exist in the destination directory; therefore, the copy operation was skipped. |
| 1 | All files were copied successfully. |
| 2 | There are additional files in the destination directory that are not present in the source directory. No files were copied. |
| 3 | Some files were copied. Additional files were present. No errors occurred. |
| 5 | Some files were copied. Some files had a consistency issue. No failures occurred. |
| 6 | There are additional files and files with consistency issues. No files were copied and no failures occurred, which means the files already exist in the destination directory. |
| 7 | Some files were copied, one file had a consistency issue, and additional files were present. |
| 8 | Several files were not copied. |
Advanced Use of Robocopy
To wrap up this article on Robocopy, we’ll look at two additional points regarding Robocopy
Test the Robocopy command with the /L
The option/L lets you list the actions (copy, delete, update) for files and folders without actually performing the action.
robocopy "C:\Source" "D:\Destination" /MIR /L /LOG:"C:\Logs\simulation.log"Clearing a Folder with Robocopy
One unconventional use of Robocopy is to delete files and folders on file servers. Deleting files and folders on file servers can be problematic for several reasons:
- Paths that are too long
- Explicit NTFS permissions
- …
To save time, we’ll leverage the power of Robocopy to perform a file deletion by copying an empty directory into a non-empty folder using the option /MIR
Start by creating an empty folder: C:\Empty.
Copy the folder in mirror mode:
robocopy "C:\Empty" "D:\Folder\ToDelete" /MIR /NFL /NDL /NJH /NJS /NC /NC /NPFAQ – Frequently Asked Questions About Robocopy
What is the difference between Robocopy and Xcopy?
Robocopy is newer, more robust and more complete than Xcopy.
It handles errors, can resume an interrupted copy, retains NTFS permissions, and supports multithreaded copying. Xcopy is now obsolete.
How do I exclude certain files or folders?
Uses the following options:
/XF to exclude files
/XD to exclude folders
Example:
robocopy "C:\Source" "D:\Sauvegarde" /MIR /XF *.tmp *.bak /XD "C:\Source\Temp"
How to schedule a Robocopy task automatically?
You can create a Windows scheduled task (via Task Scheduler) that runs your PowerShell script or Robocopy command.
This allows daily or weekly backups to be automated without manual intervention.
How to generate a report or execution log?
Use the /LOG option to save results to a text file:
robocopy "C:\Source" "D:\Backup" /MIR /LOG:"C:\Logs\robocopy.log"
You can also add /TEE to display the result on screen and in the file.
How to copy only modified files?
Robocopy handles this automatically with the /MIR (mirror) option, but you can also use /XO (exclude older) or /MAXAGE:n to copy only recent files.
Does Robocopy retain NTFS rights and permissions?
Yes, provided you use the /COPYALL or /SEC options to include permissions and security attributes when copying.
Can we use Robocopy on a network share?
Yes, Robocopy works perfectly with UNC paths:
robocopy "C:\Données" "\\ServeurSauvegarde\Partage" /MIR
Conclusion
Robocopy is much more than just a copying tool: it’s a true ally for managing and backing up files in Windows.
Thanks to its robustness, numerous options, and native compatibility with PowerShell, it adapts to all needs—whether it’s daily synchronization, data migration, or automated backups.
Whether you’re a system administrator, technician, or advanced user, mastering Robocopy will help you gain efficiency, reliability, and greater control over your copy operations.