In this tutorial, we will see how to install and configure Erugo in order to set up a real alternative to WeTransfer in self-hosting.
Online file transfer services are convenient, but they often involve entrusting your data to third-party platforms, with little visibility into its storage, retention period, or location.
By self-hosting Erugoyou keep the total control of your files, their access and their lifecycle, while offering a simple-to-use solution for your users.
We will see step by step how to deploy Erugo on your server, make it accessible via a web interface and obtain a reliable, secure file sharing service entirely under your control.
The version 0.2.0 d’Erugo now allows self-registration of users, which now allows its deployment in a professional environment.
Table Of Content
Prerequisites for deploying Erugo
To set up Erugo you will need:
- A Docker server and Docker Compose for deploying Erugo
- An SMTP server is available for sending emails (sharing, user registration, etc.)
- A reverse proxy (Nginx, Traefik) with an SSL certificate for the Erugo deployment
Optional: an SSO portal type Keycloak Or Authentik for OpenID authentication.
Deploying Erugo with Docker
First, create the folder where you want to put Erugo, then navigate into it:
mkdir -p /containers/erugo
cd /containers/erugo
Create the file docker-compose.yml
nano docker-compose.ymlFile contents docker-compose.yml :
services:
  app:
    image: wardy784/erugo:latest
    restart: unless stopped
    volumes:
      - ./erugo-storage:/var/www/html/storage
    ports:
      - "8080:80"
Adjust the port to suit your environment
Start the container:
docker compose up -dWe will now proceed to configure the administrator account. Open an internet browser and go to the following address: http://ip-host-docker:8080.
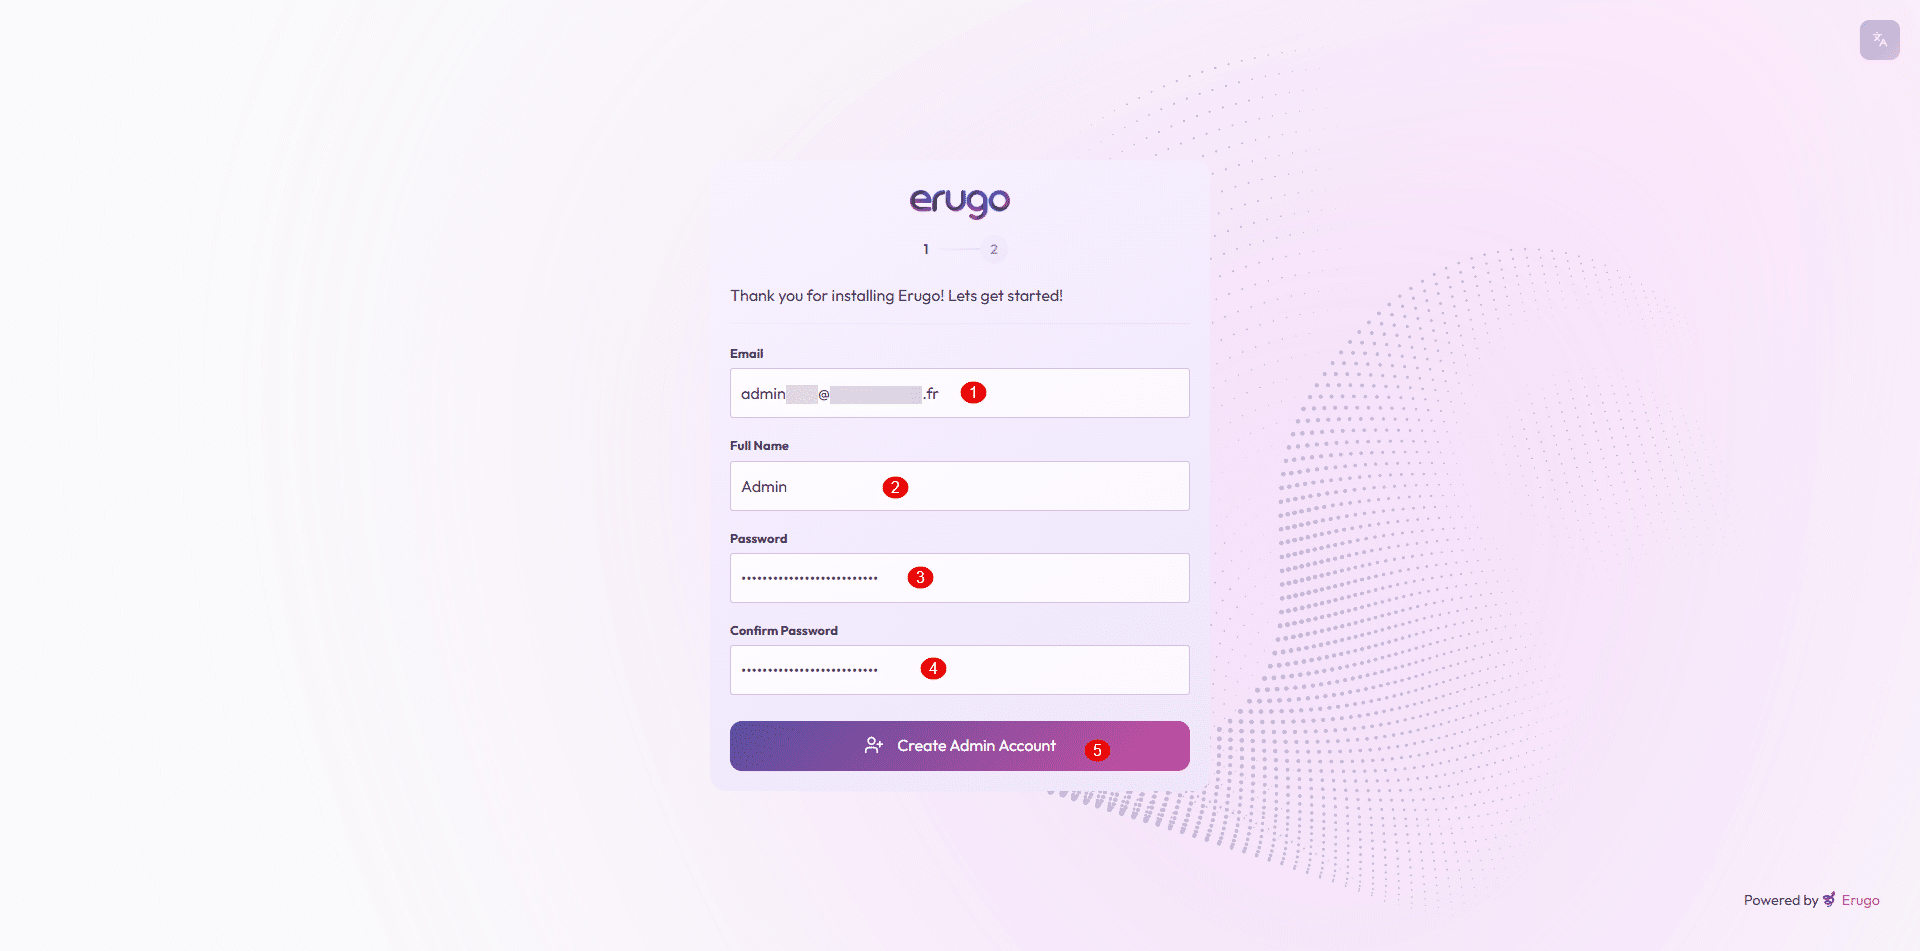
We arrive at a form that will allow us to create the first user account, which will also be an administrator. Enter an email address 1, a name for the account 2 then the password 3 which we confirm 4 and click on Create Admin Account 5.
In the second step, the assistant offers you to configure the application name, its URL and to add a logo; for my part, I will skip this step and click on Skip & Log In Now.
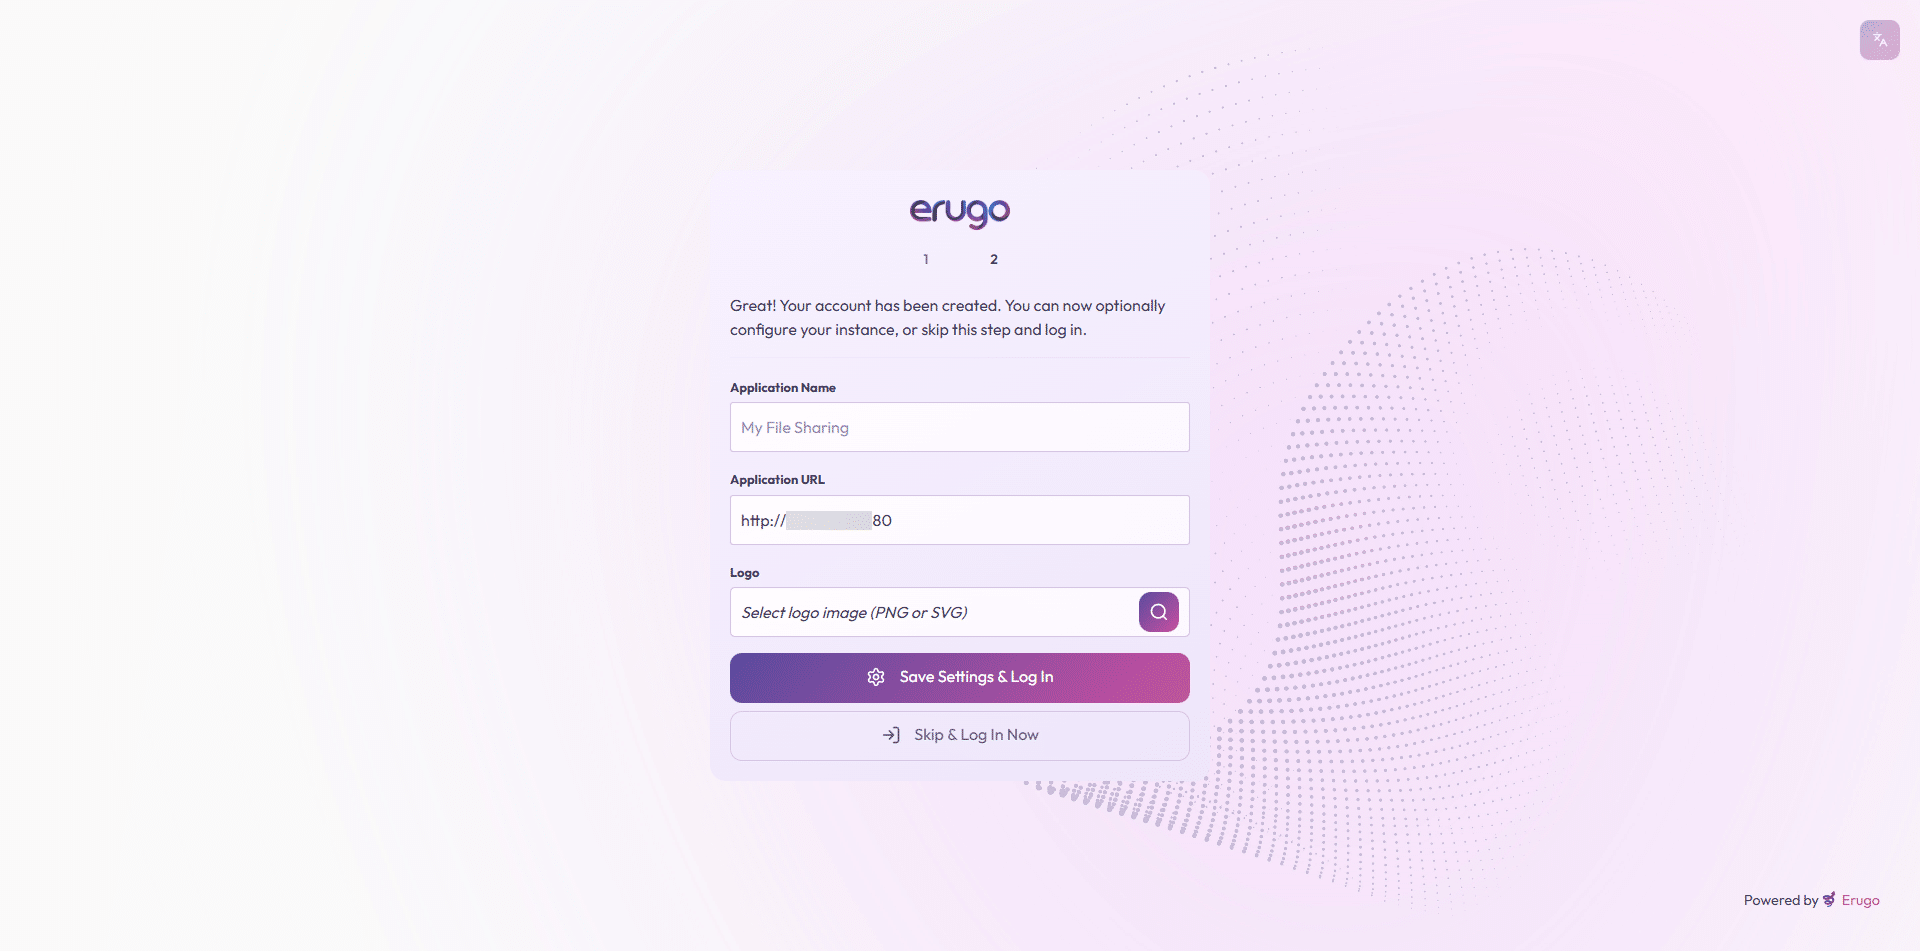
For my part, I configured this part later, once the reverse proxy was configured.
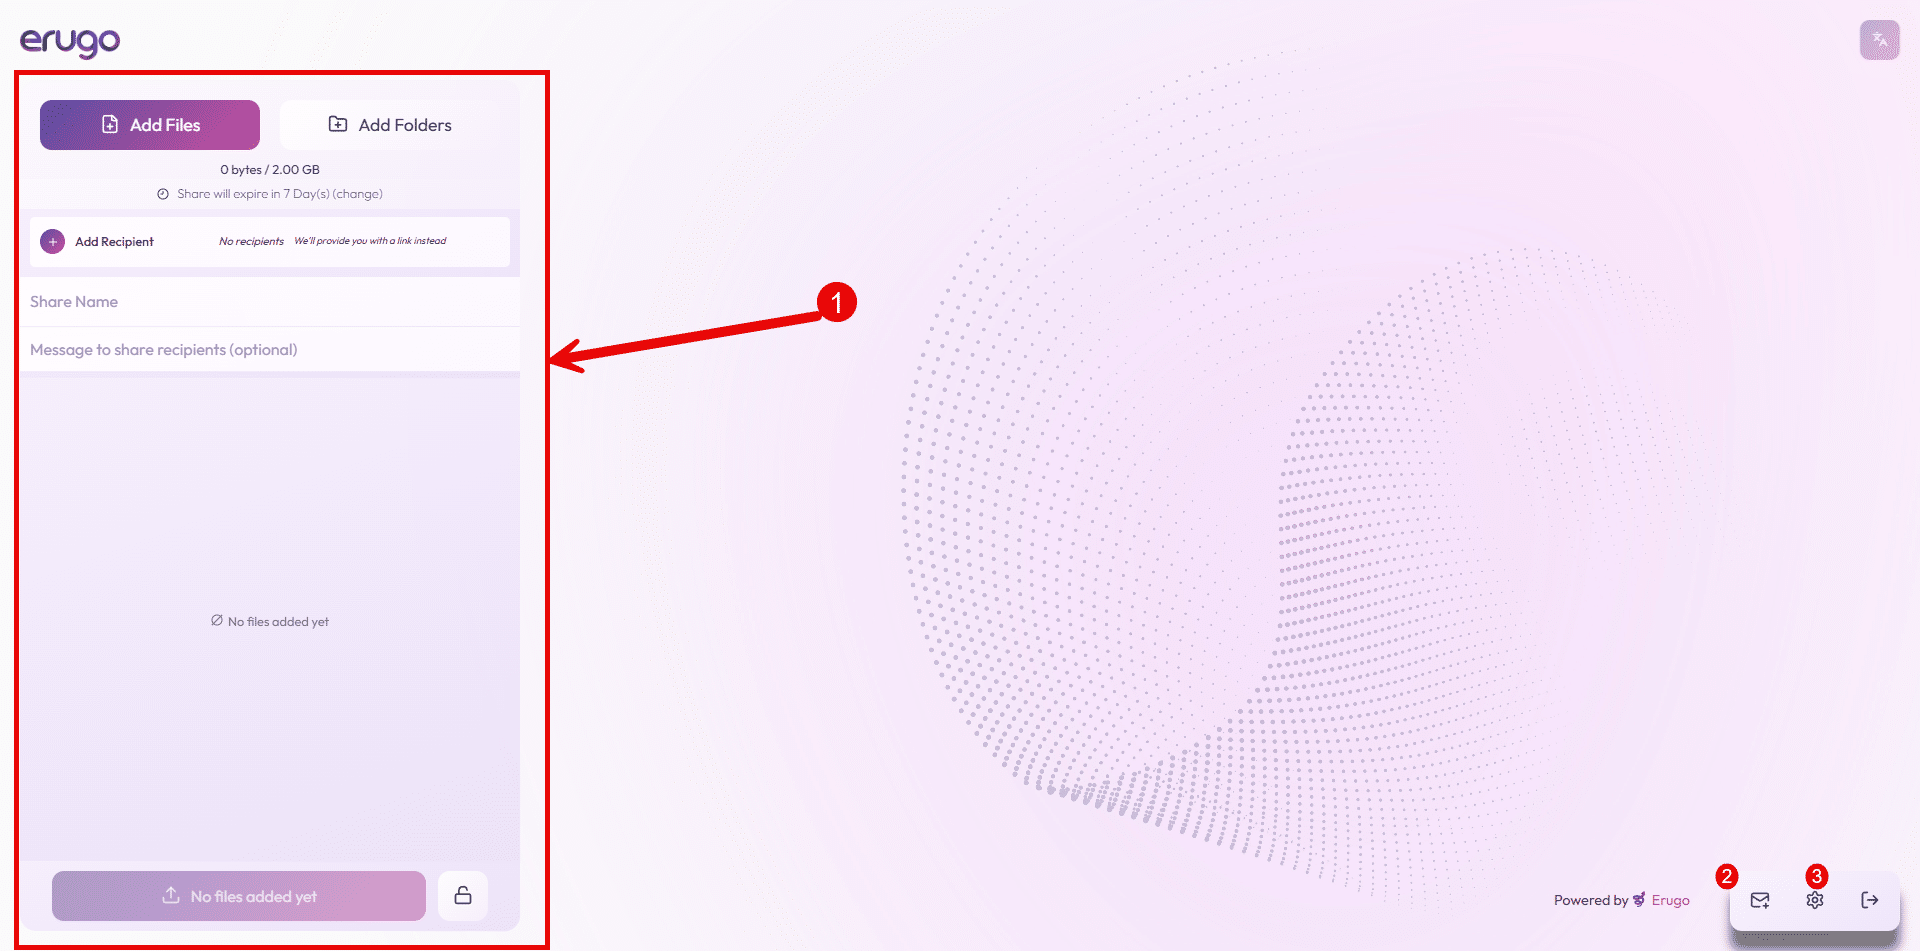
Once connected, we arrive at the Erugo interface, which will allow us to share files 1, create a reverse share 2 or access the configuration 3.
Configure a reverse proxy for Erugo
In the official documentation, you will find several examples of reverse proxy configurations, which are available here: https://erugo.app/docs/guides/reverse-proxy/
Example for Nginx:
server{
  # URL
  server_name erugo.domain.tld;

  listen 443 ssl;
  http2 on;

  # SSL Certificate
  ssl_certificate /etc/nginx/ssl/domaintld.cert;
  ssl_certificate_key /etc/nginx/ssl/domaintld.key;

  # Config upload size
  client_max_body_size 0;

  # Remove header require Nginx module
  #more_clear_headers Server;
  #more_clear_headers X-Powered-By;

  # Log on top
  access_log /var/log/nginx/erugo.domain.tld_access.log;
  error_log /var/log/nginx/erugo.domain.tld_error.log;

  rental / {
    proxy_pass http://ip-docker-host:8080;
    include proxy_params;
    proxy_ssl_verify off;
    proxy_http_version 1.1;
    proxy_set_header Upgrade $http_upgrade;
    proxy_set_header Connection "upgrade";
  }
}
Labels for Traefik to add to the file docker-compose.yml :
labels:
      - "traefik.enable=true"
      - "traefik.docker.network=proxy"
      - "traefik.http.routers.erugo.rule=Host(`erugo.domain.tld`)"
      - "traefik.http.routers.erugo.entrypoints=websecure"
      - "traefik.http.services.erugo.loadbalancer.server.port=80"
      - "traefik.http.routers.erugo.service=erugo"
      - "traefik.http.routers.erugo.middlewares=erugo-headers"
      - "traefik.http.middlewares.erugo-headers.headers.sslProxyHeaders.X-Forwarded-Proto=https"
      - "traefik.http.middlewares.erugo-headers.headers.sslProxyHeaders.X-Forwarded-For=true"
      - "traefik.http.middlewares.erugo-headers.headers.sslProxyHeaders.X-Real-Ip=true"
      - "traefik.http.middlewares.erugo-headers.headers.sslProxyHeaders.X-Forwarded-Port=443"
      - "traefik.http.middlewares.erugo-headers.headers.customRequestHeaders.X-Forwarded-Proto=https"
      - "traefik.http.middlewares.erugo-headers.headers.customRequestHeaders.X-Forwarded-Port=443"
This section is specific to each environment.
Configure the Erugo URL in the application
Now that you have configured your reverse proxy, we will go into the Erugo settings to configure the URL so that the links sent in emails are correct.
In the administration, go to System settings 1 then in the General section, configure Application URL 2 then click on Save System Settings 3.
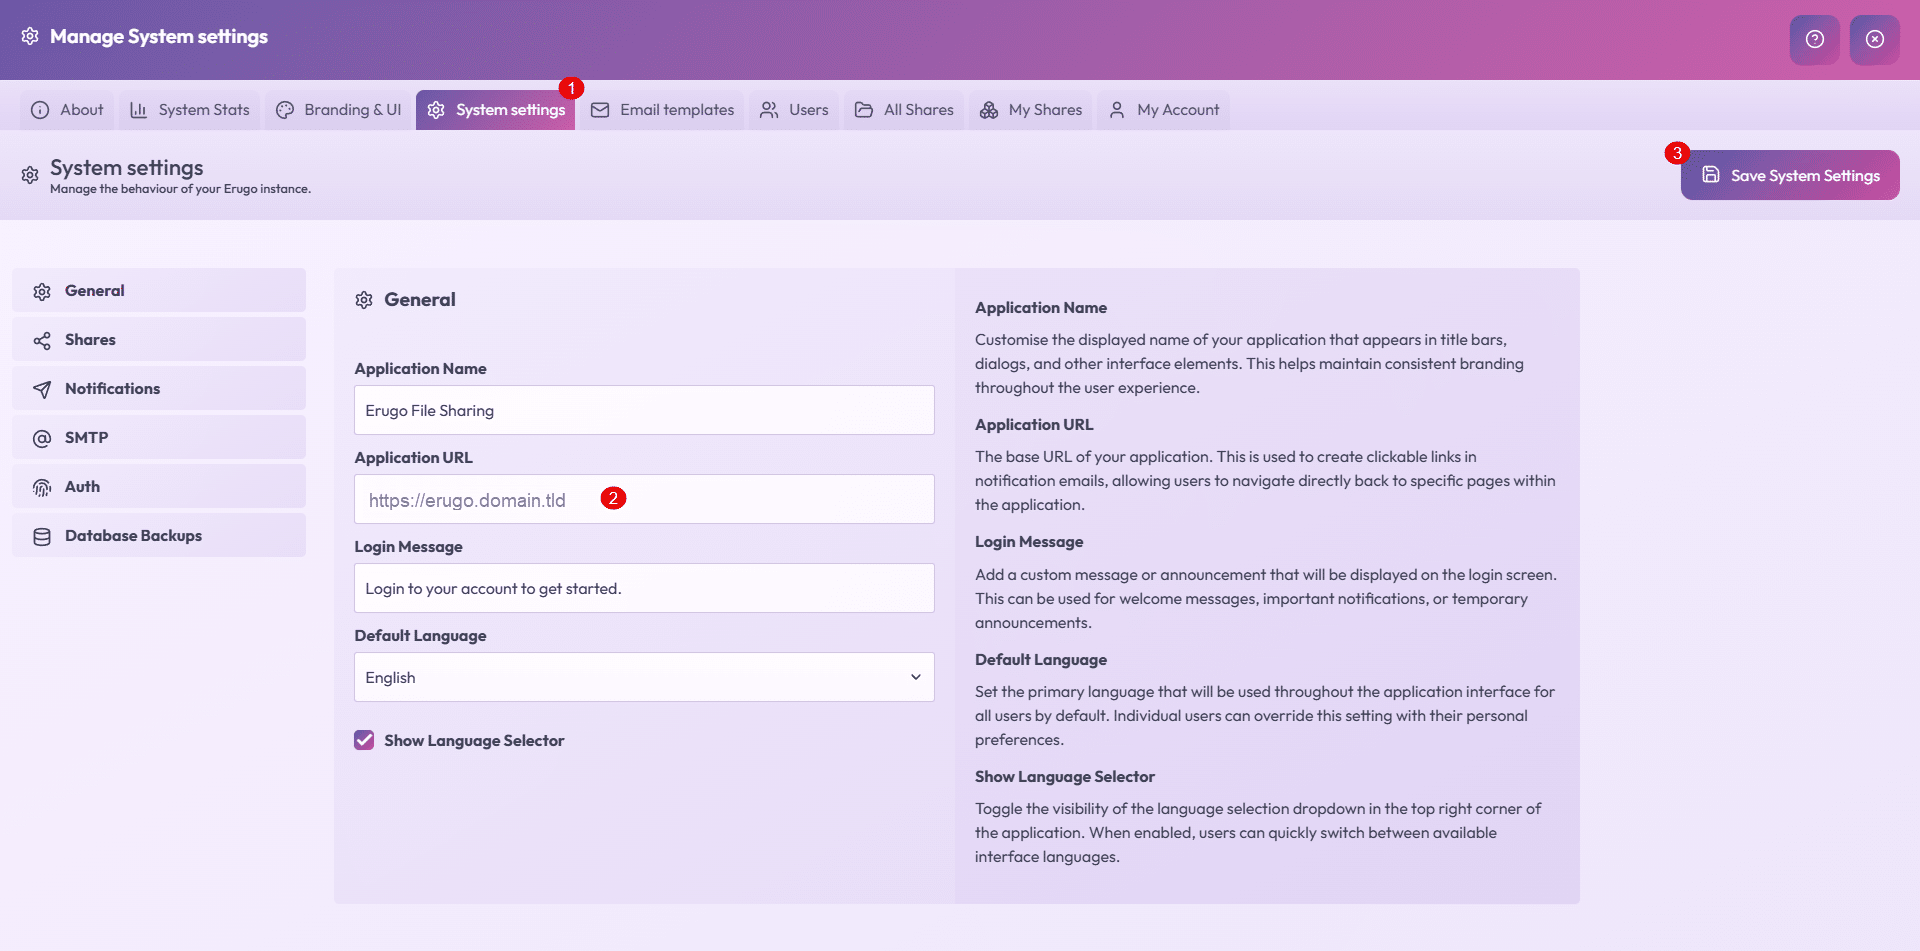
While you’re here, you can change the application name, the login text, and the default language.
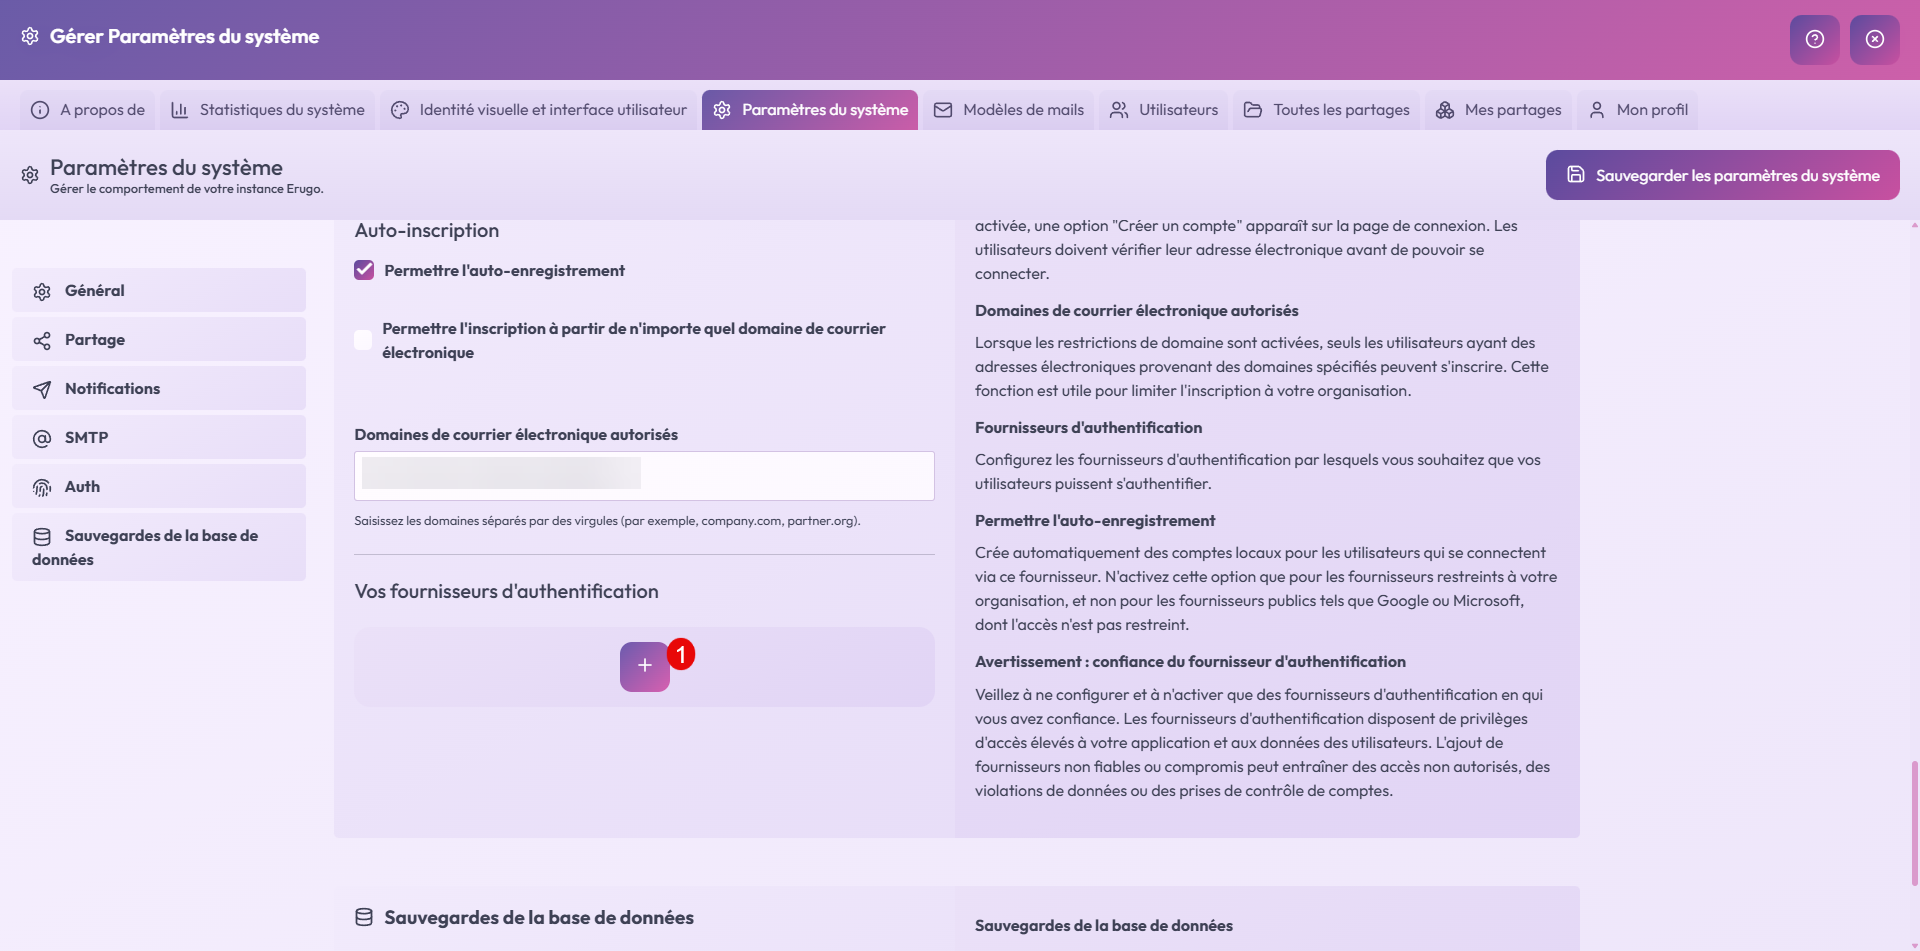
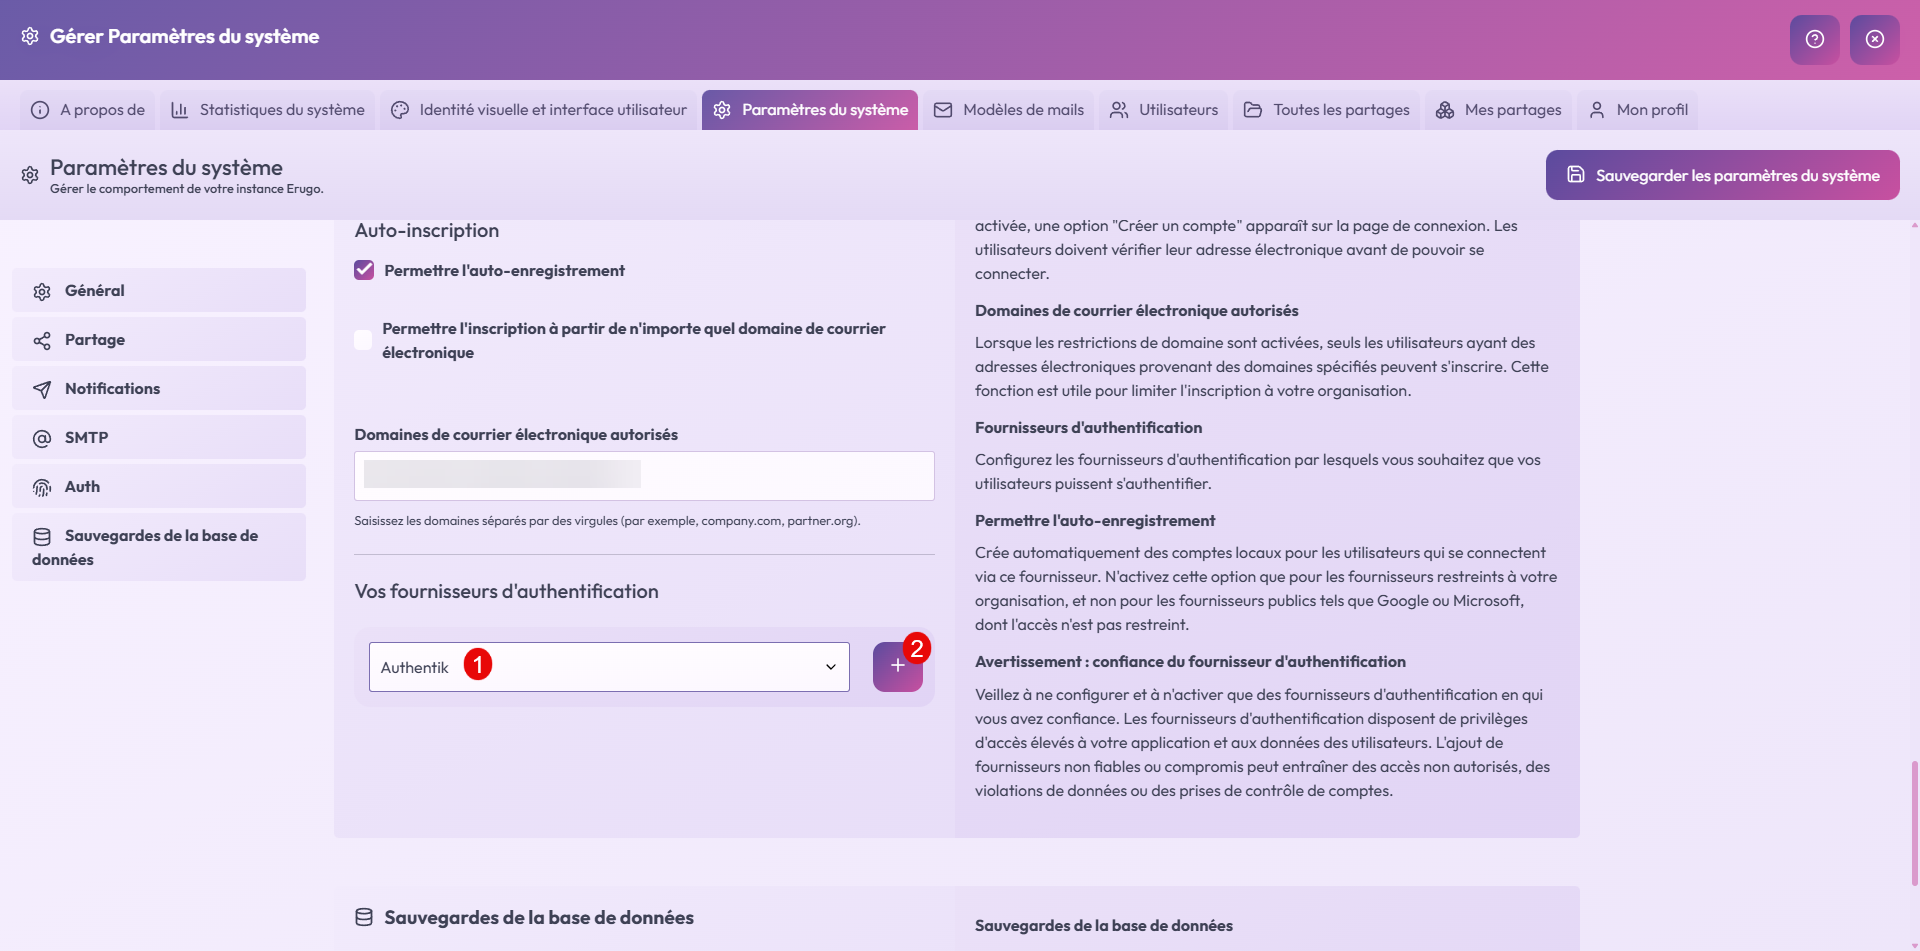
Configure self-registration
Erugo version 0.2.0 now allows for user self-registration, a highly anticipated feature that enables users to create their account upon their first use. To prevent account creation, registration can be restricted to specific email domains.
In the System Setting section, go to the Auth section 1, check the Enable self-registration box 2, indicate the authorized email domains 3 (separate with a comma if there are several) and click on Save System Setting 4.
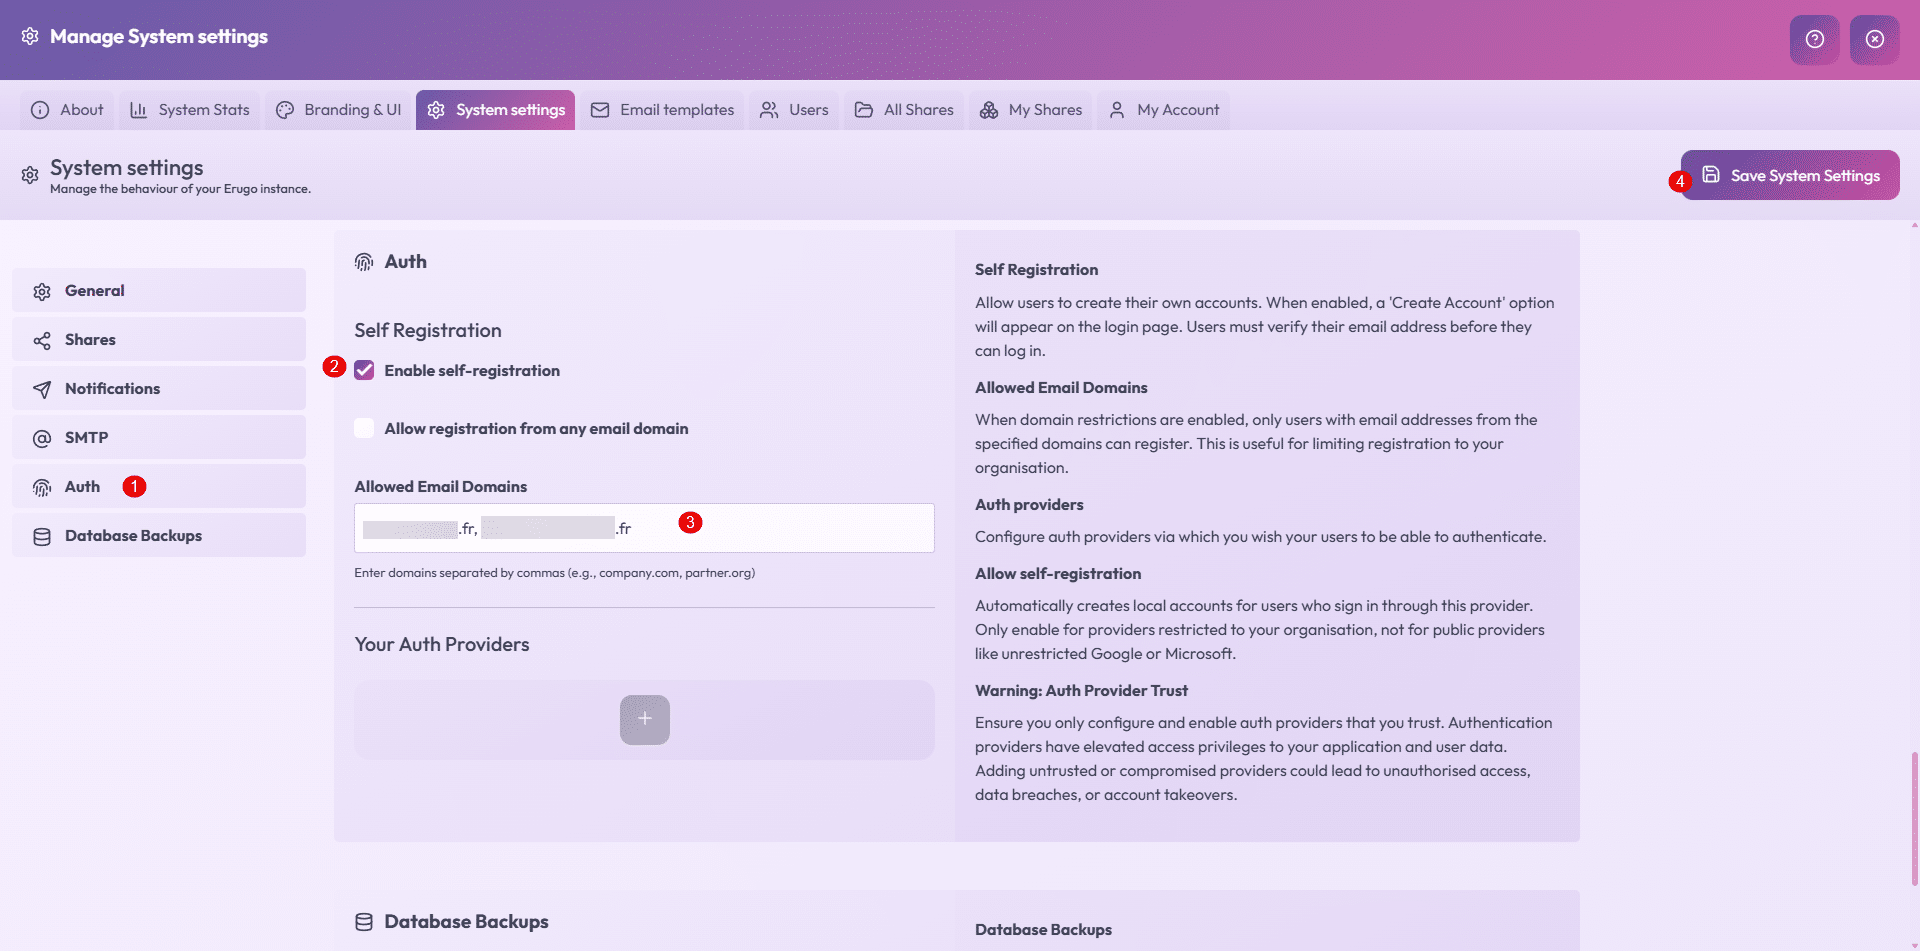
The user will need to validate their account using a code sent to their email address, which implies having an SMTP server configured.
Configure the SMTP server
This element is essential if you wish to use Erugo, in the System Setting -> SMTP 1 section, enter your SMTP server configuration 2 and click on Save System Settings 3.
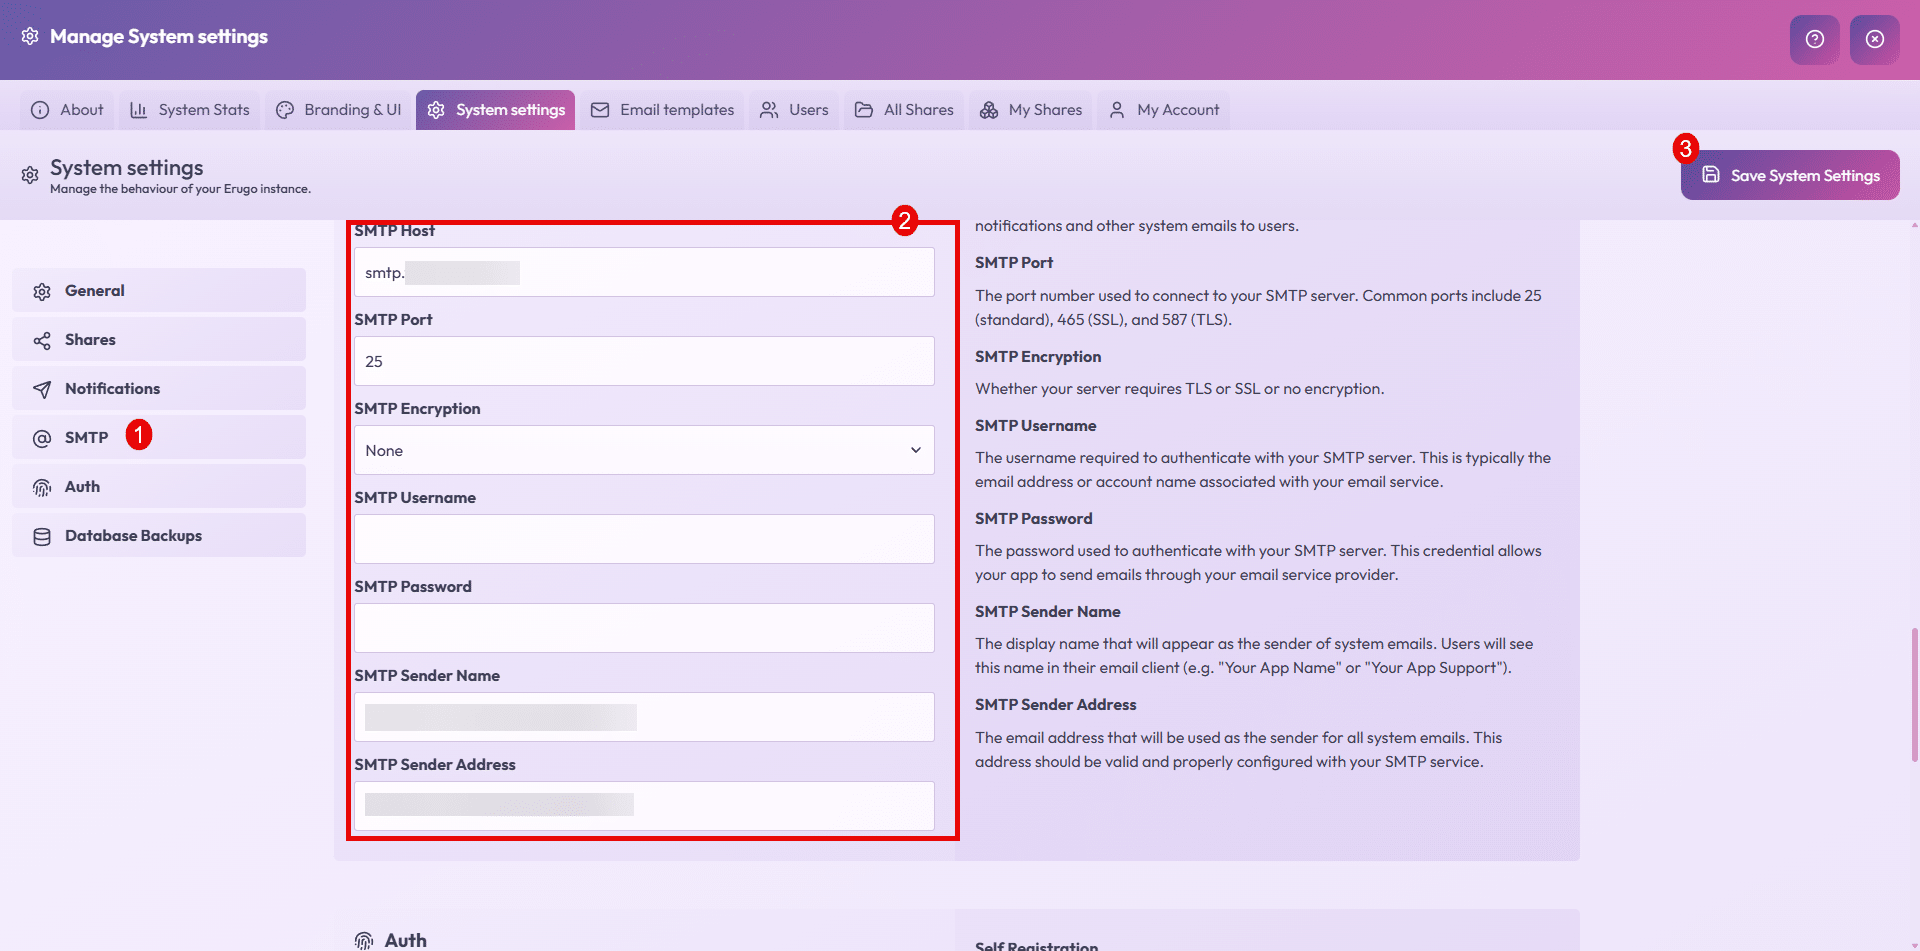
Here too, I won’t go into detail, because the parameters will be different for each environment; remember to configure the SMTP Sender Name and SMTP Sender Address fields.
Configuring SSO with Authentik
As you may have noticed in my various tutorials, I use many solutions that support OpenID which I configure with Authentik, luckily Erugo supports OpenID, which in a professional environment makes it easy to put applications in place for users.
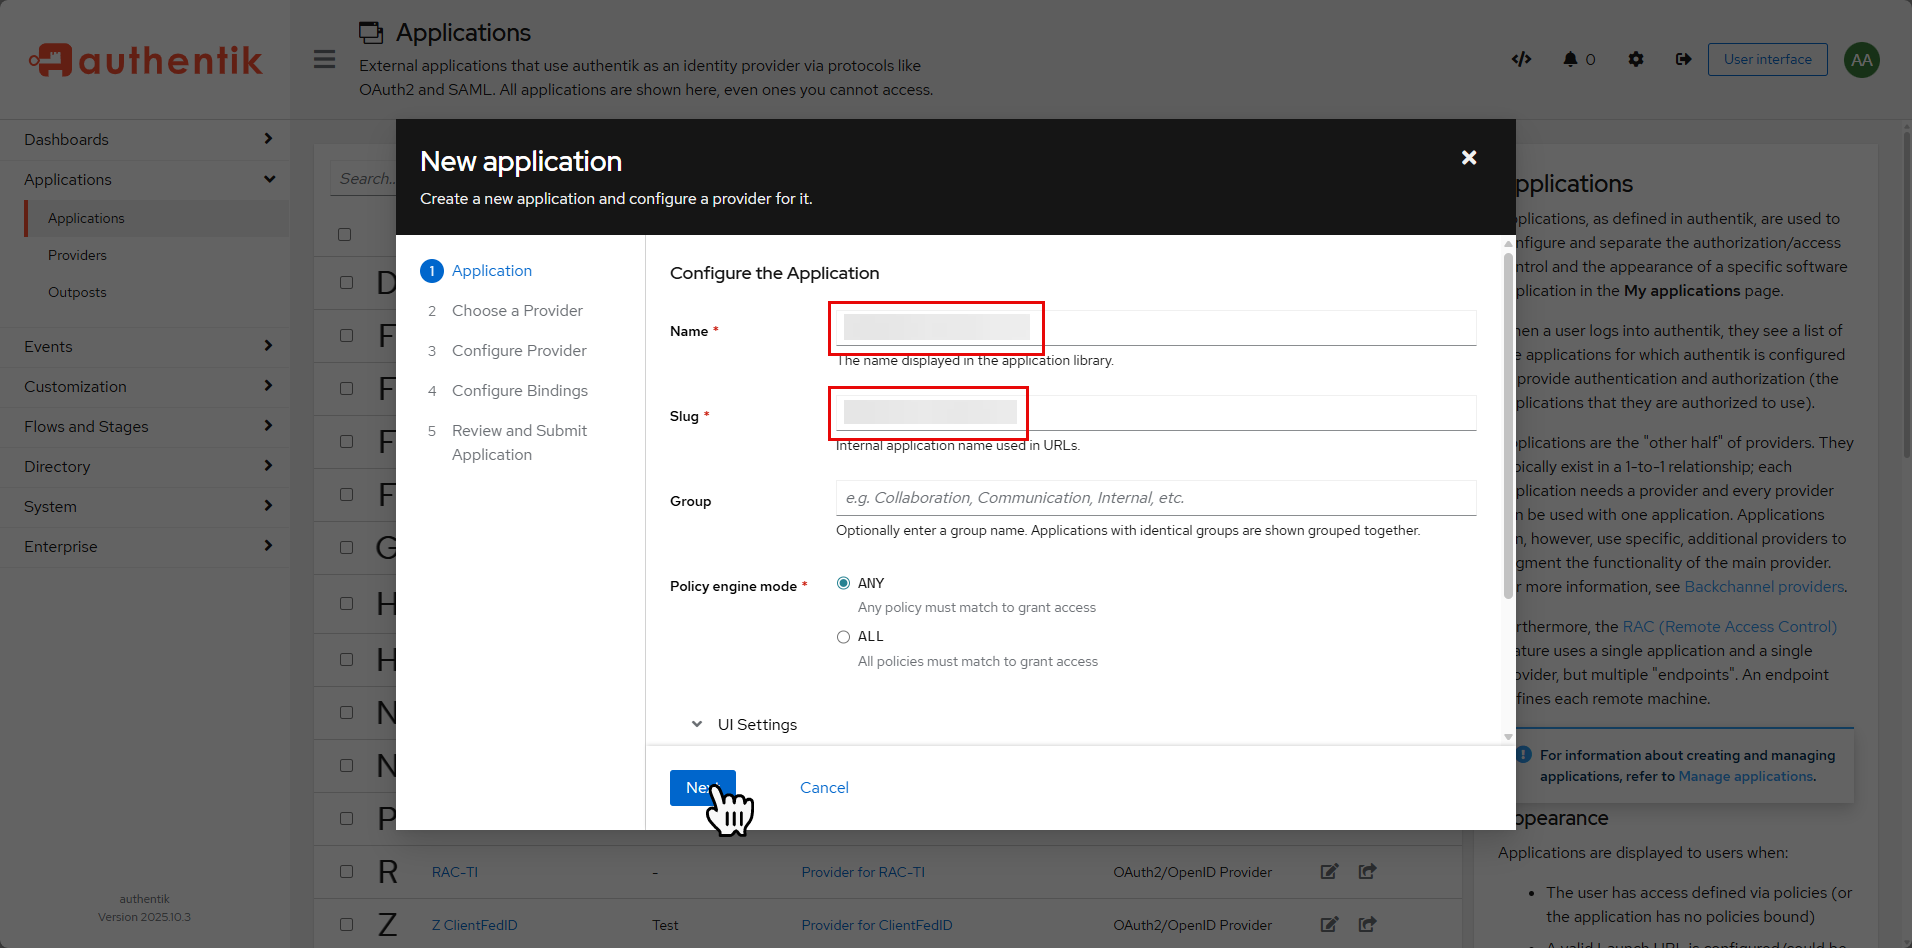
To begin, in Authentik, create an application with a provider.
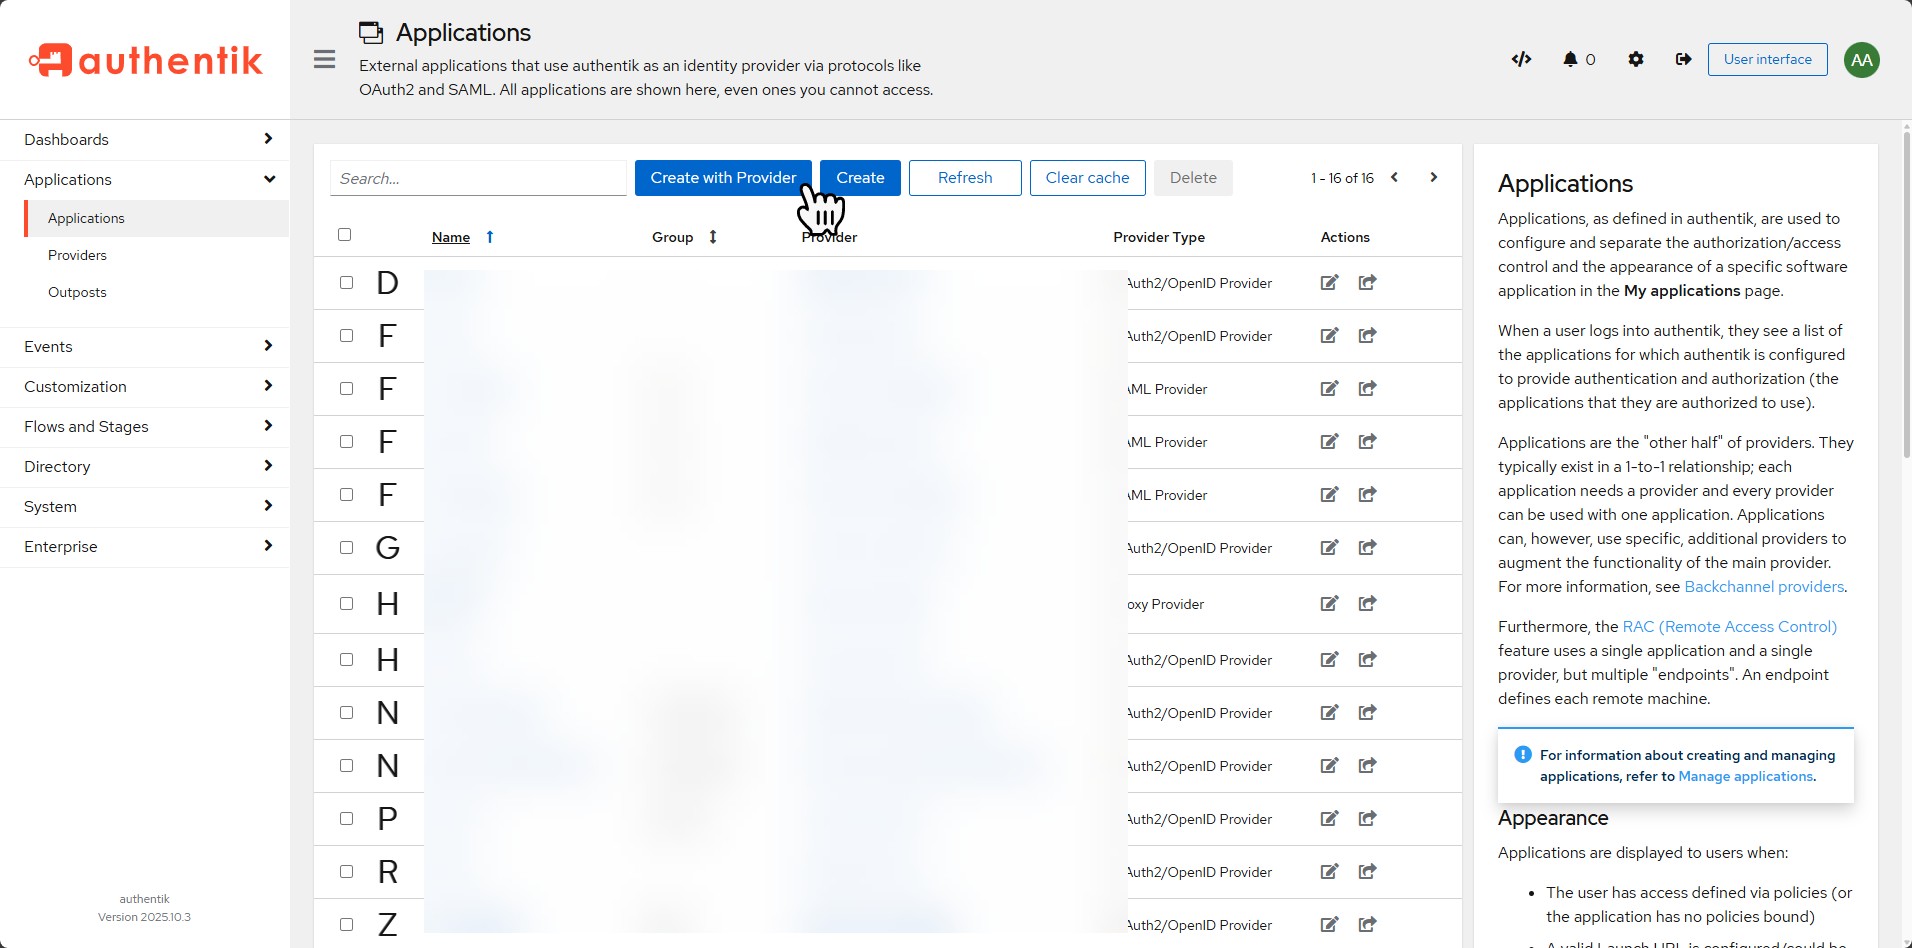
First, configure the application and then select the OAuth2/OpenID Provider type provider.
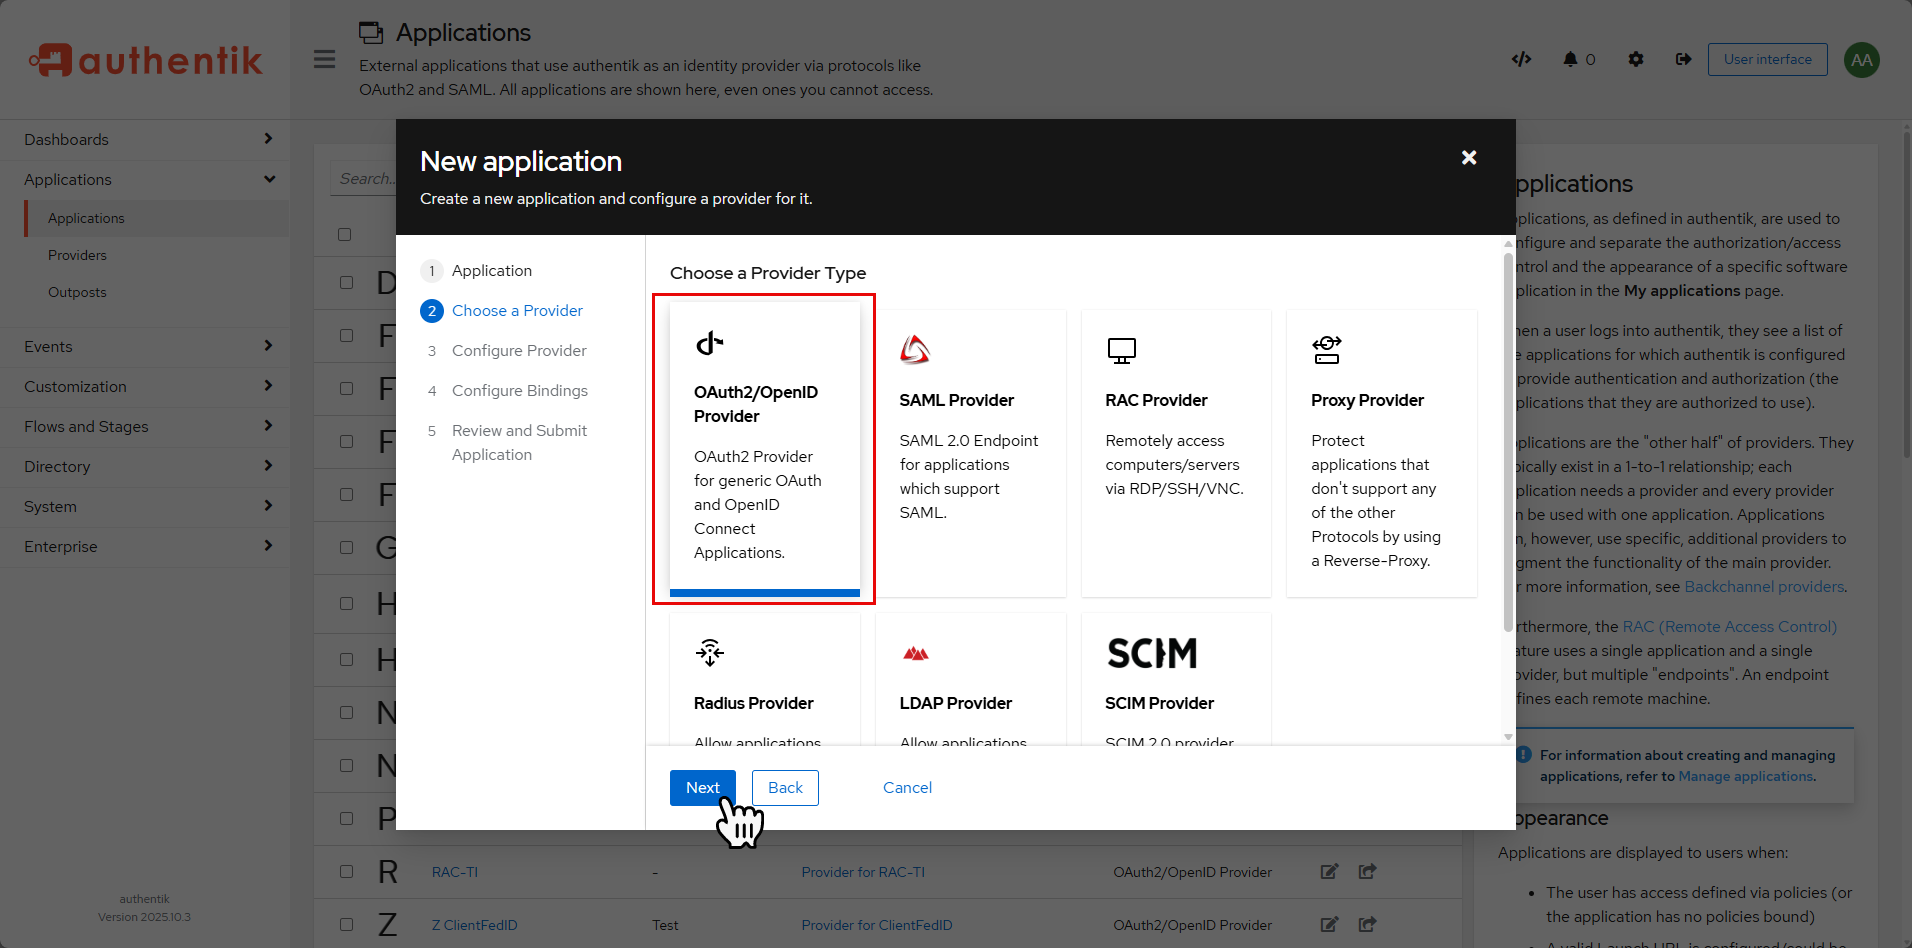
In the provider configuration, there is nothing special to configure, click on the Next button.
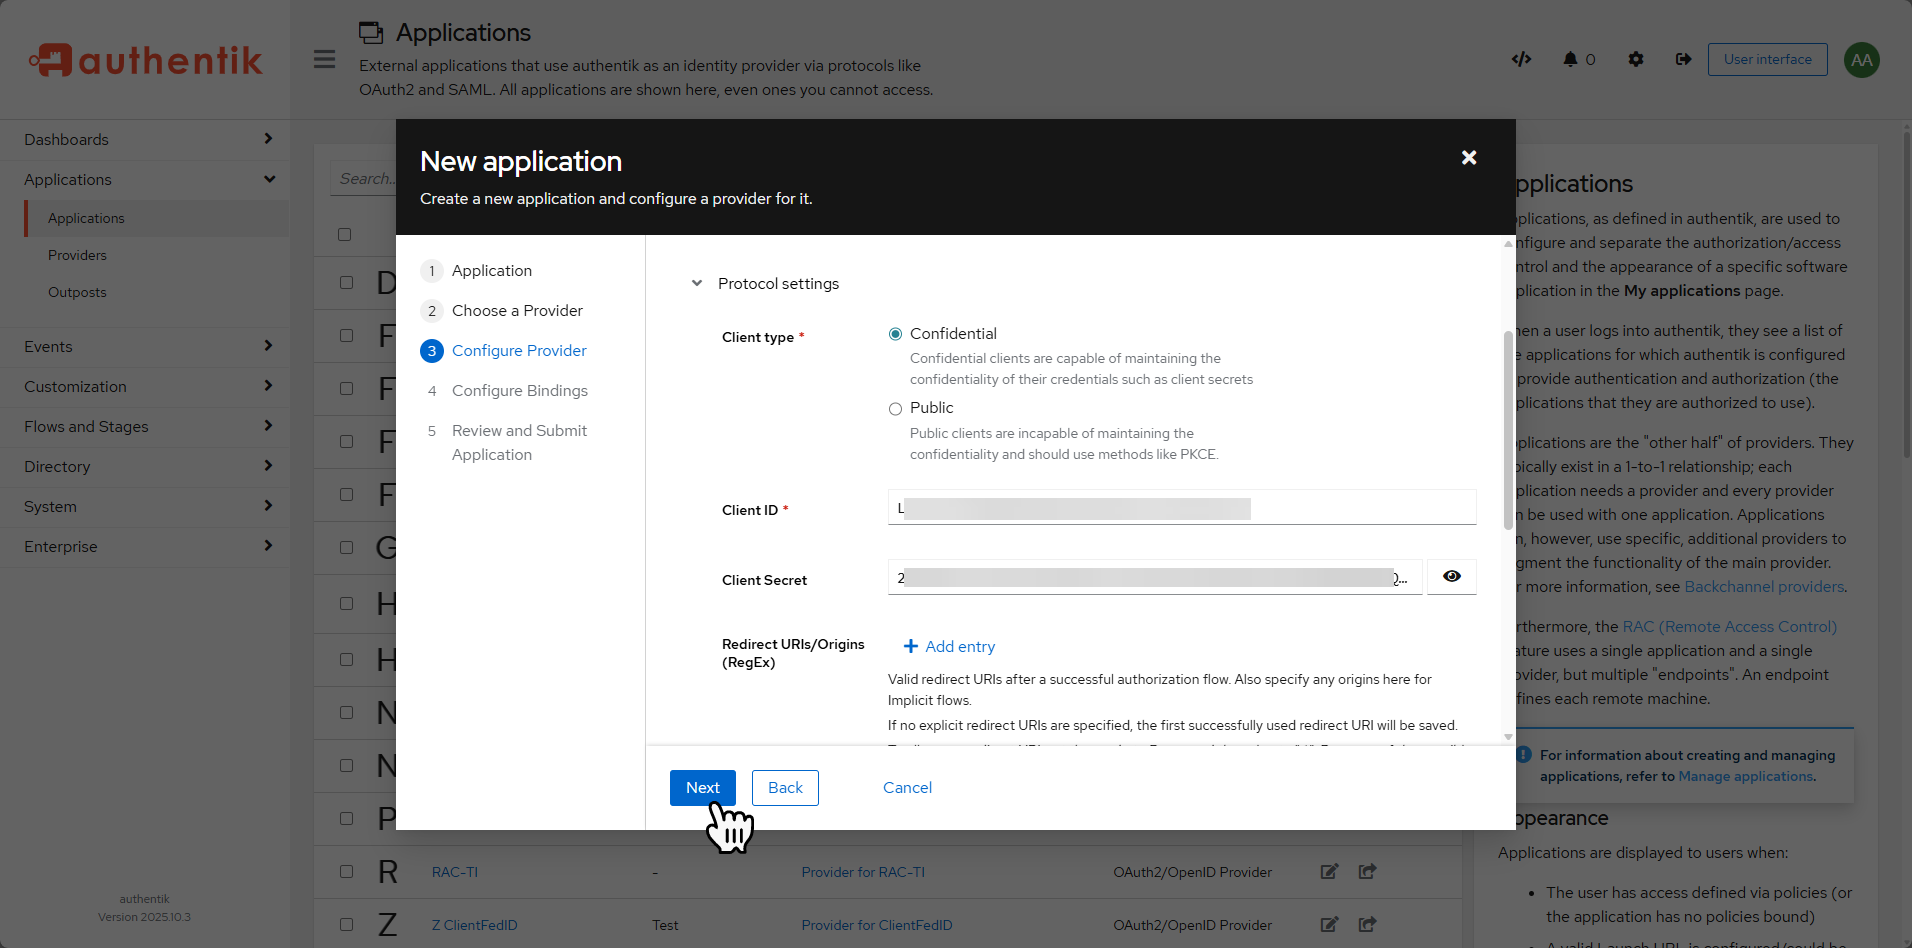
To save time, copy the Client ID and Client Secret fields into a notepad.
Continue following the wizard to create the supplier in Authentik.
Back in Erugo settings in the Auth section, click on the + 1 button below Your authentication providers.
In the list of suppliers, select Authentik 1 and click on the + 2 button.
We will go through the configuration, start by checking the Enable 1 and Allow self-registration 2 boxes, the Provider Name field 3 will be the text displayed on the connection form, in the Client ID field 4 enter the Client ID, in the Client Secret field enter Client Secret 5 then enter the Authentik base URL 6 and click on Save system settings 7.
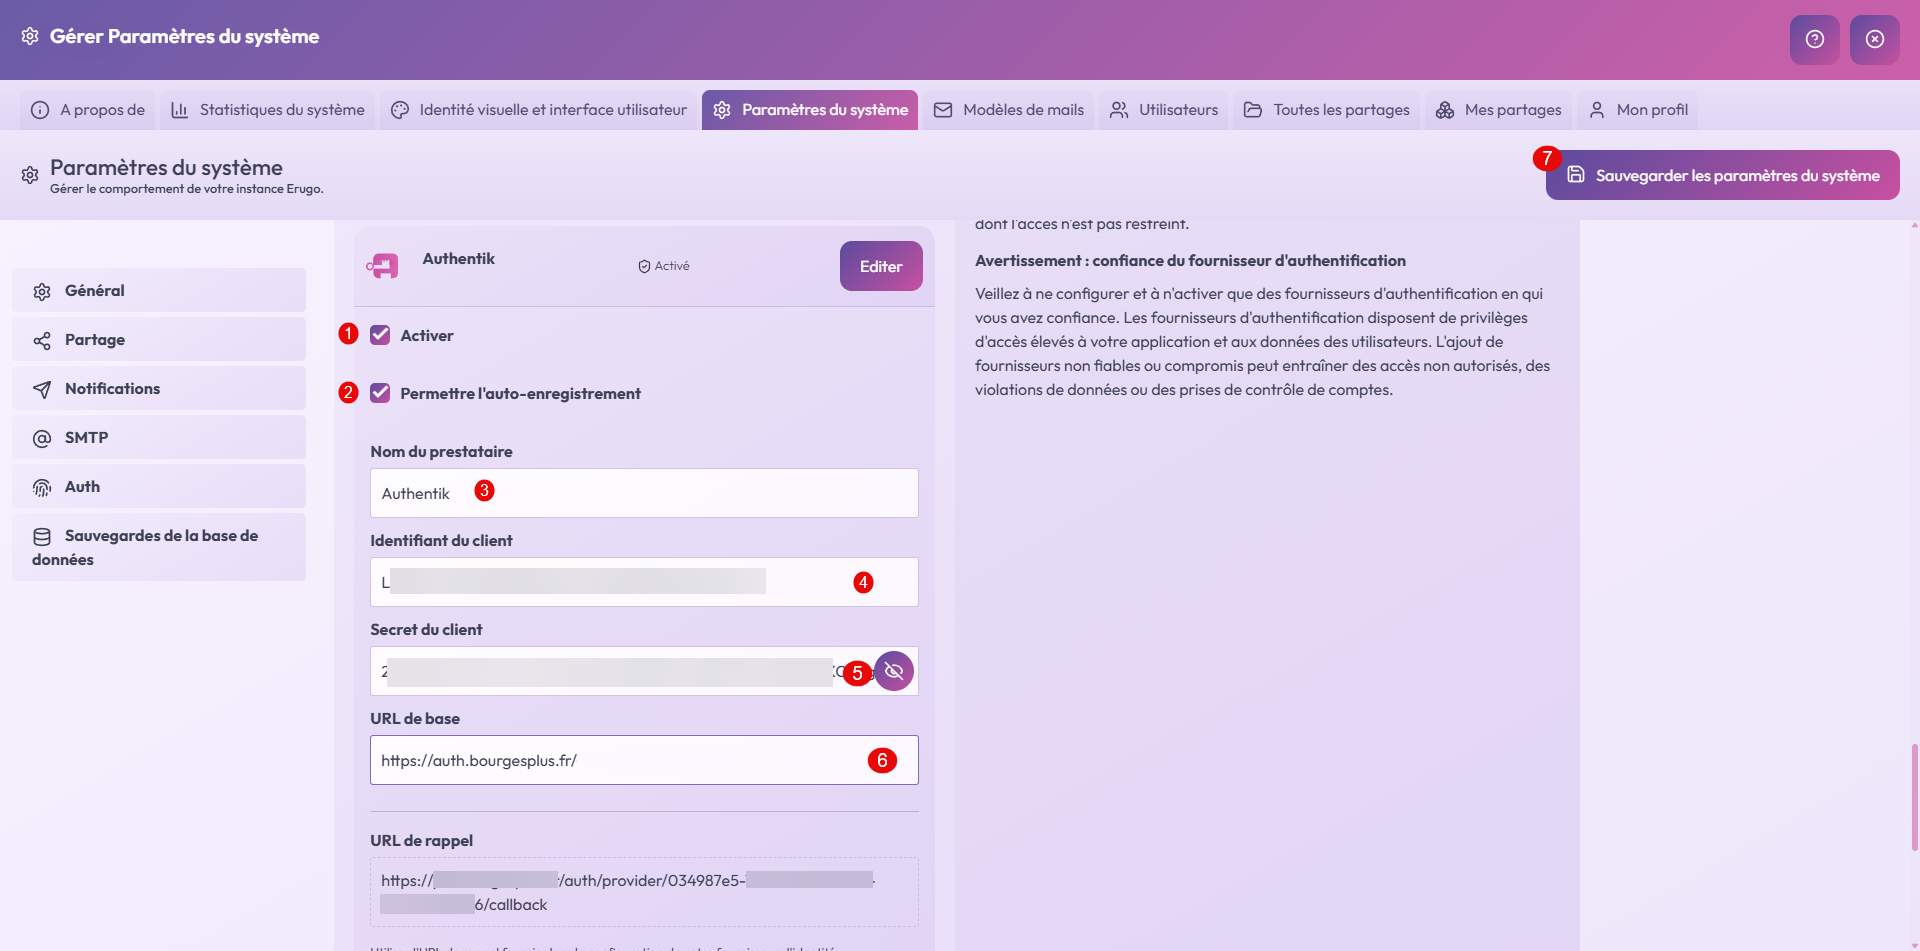
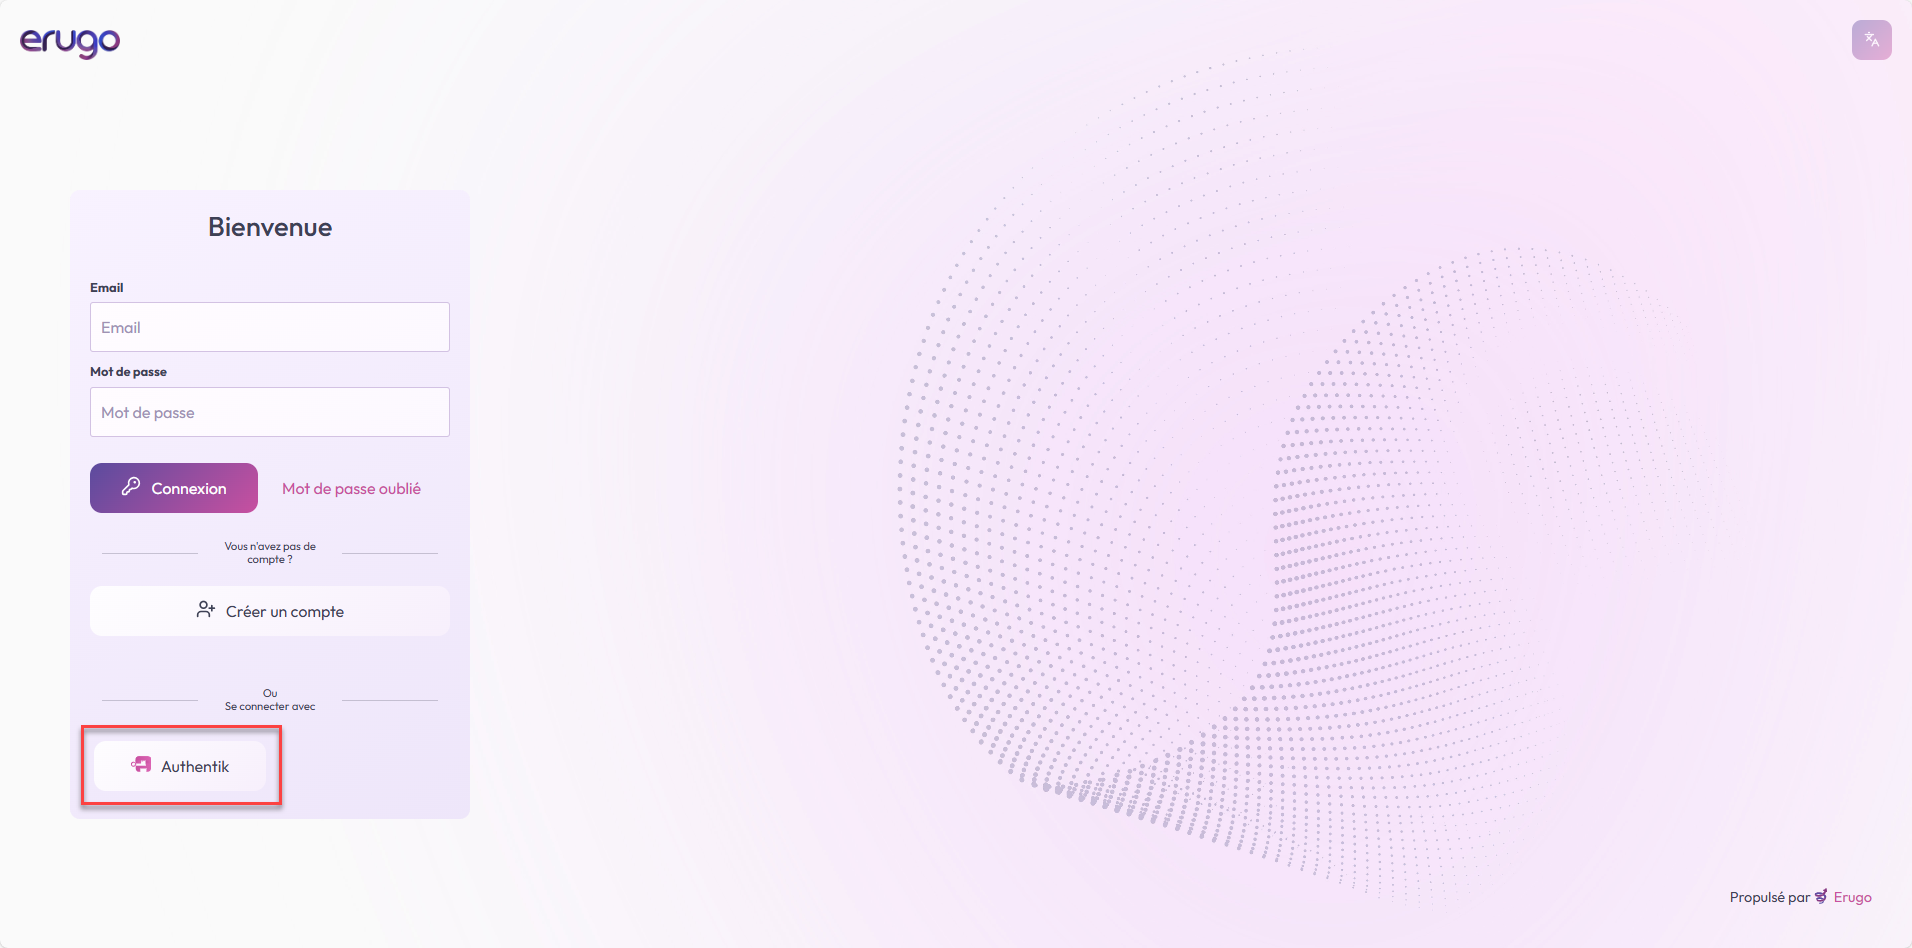
On the login page, you can now log in with Authentik.
If all your users can use Authentik, I advise you to disable email auto-registration.
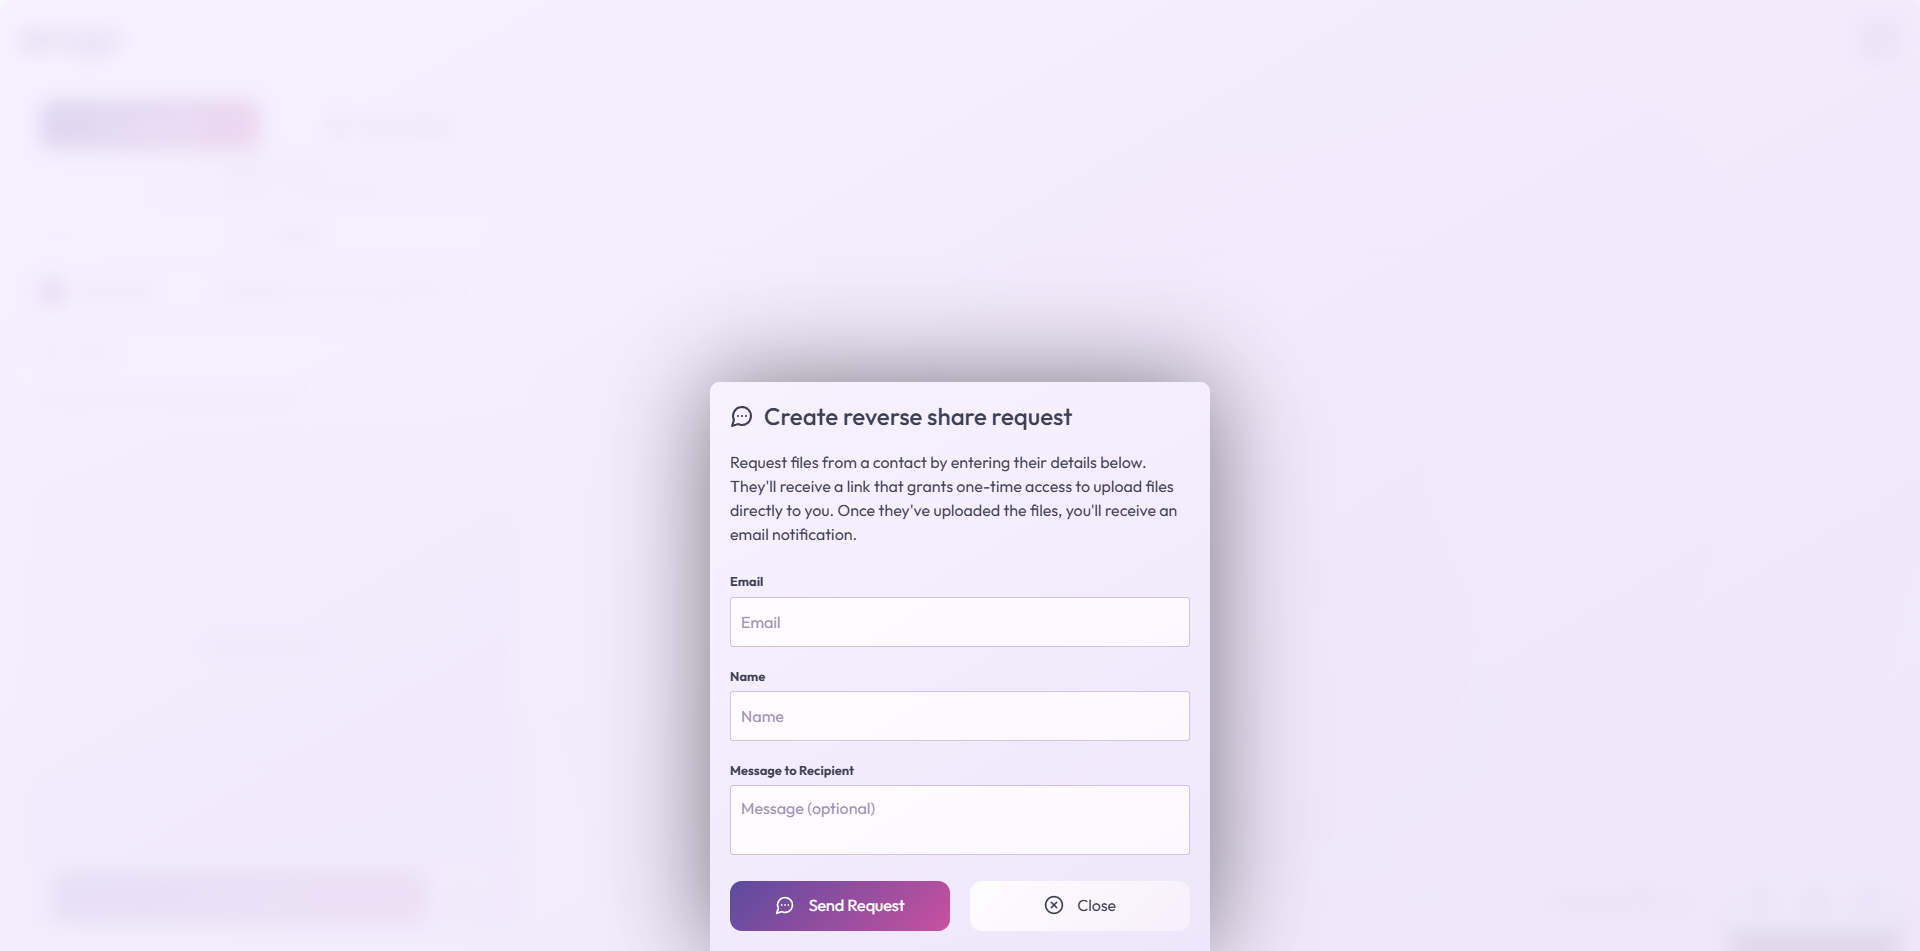
Create a reverse sharing request
To conclude this tutorial, I’m going to focus briefly on: Create a reverse sharing requestAs we’ve seen, to share a file with Erugo, you need an account in the application. It’s possible to request a reverse file sharing request, for example, from a supplier who needs to provide you with a file. Creating a reverse file sharing request will send an email with a link where the person can send you the file.
Conclusion
With ErugoIt is possible to set up a real alternative to WeTransfer by self-hosting, while keeping total control over your data and infrastructure.
This tutorial intentionally does not cover all the features offered by the tool. Erugo offers even more possibilities that I’ll let you discover for yourself, depending on your needs and how you use it.
In terms of use, it’s quick to learn: the interface is intuitiveclear and very close to that of WeTransferThis allows users to find their way around immediately, without any special training.
Erugo is therefore an effective, modern and accessible solution for file sharing, both in a professional and personal context.
FAQ – Erugo
Is Erugo an alternative to WeTransfer?
Yes. Erugo offers the same main uses as WeTransfer (sending and sharing files via a link), while being self-hosted. This allows you to maintain full control over the data, its storage and its retention period.
Is Erugo complicated for users to use?
No. The interface is intuitive and very similar to that of WeTransfer. A user can send and share files without any training or special technical knowledge.
Do you have to create an account to use Erugo?
It depends on the configuration chosen. The administrator can allow or not allow user registration. Since version 0.2.0, standalone registration is possible via the interface.
Does Erugo manage file security and confidentiality?
Yes. By being self-hosted, Erugo allows you to control where files are stored, who accesses them and how long they are retained, which is an important advantage for confidentiality and compliance.
Can we use Erugo in business?
Yes. Erugo is perfectly suited to professional use, whether for internal use or to allow external users to send and receive files securely.
